Okteto Namespaces
Namespaces in Okteto offer a flexible way to organize your Development Environments. A Namespace can last for a few weeks for developing a feature, or a couple days for a bug fix. Not only do Namespaces give you an individual separation of context while you are working, but you can also use shared Namespaces to collaborate with you team before anyone pushes to git.
In Okteto, Namespaces are categorized into two types:
-
Personal Namespaces:
Automatically generated for each user, this Namespace is uniquely named after the user's username or email, ensuring a personalized environment. These cannot be deleted, but their resources can be destroyed allowing the Namespace to be reused.
-
Non-Personal Namespaces:
These are additional Namespaces created by users or through automation, facilitating broader project collaboration and management. They may be deleted or transferred to other users.
The Okteto Dashboard enables you to independently create, launch, and share Namespaces for yourself and your team.
Manage your Namespaces
To create a Namespace, go to the Okteto dashboard, click on your Namespace on the left, and at the bottom of the Namespace list select (+) New Namespace.
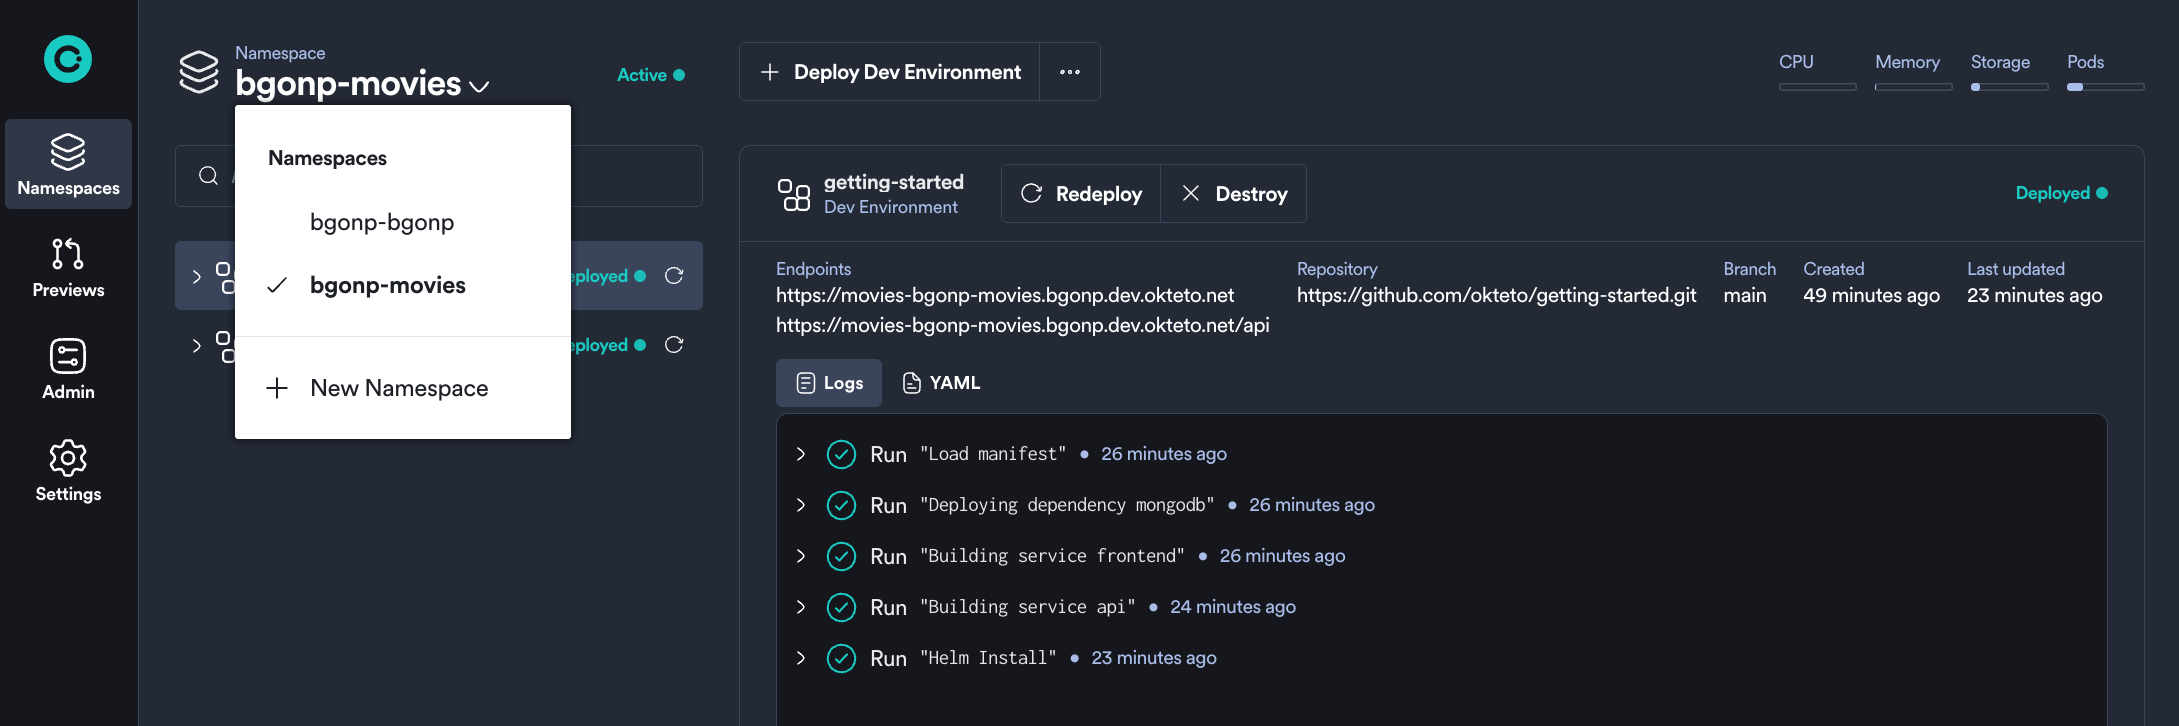
As a common pattern, you might name your Namespace by feature number, ticket number, or something similar. Development Environments in Namespaces are pulled from git branches, which is why you may want to be running multiple Namespaces at the same time.
The Okteto Admin Dashboard allows you to easily create, sleep, and wake up your Namespaces with a simple click. Specifically, you can use the Sleep and Wake dialogs for controlling your Namespace's state.
If you prefer to use the command line, here are the Namespace management options available:
- Create a Namespace with
okteto namespace create - Set your kubectl configuration to use your Namespace with
okteto kubeconfig - Delete a non-personal Namespace using
okteto namespace delete - Sleep or wake up your Namespace with
okteto namespace sleep [name]andokteto namespace wake [name]commands respectively
Administrators can specify a global, default threshold for automatically sleeping a Namespace in the garbage collection configuration.
Sharing and Collaboration with Namespaces
By default, you'll be the only person with access to your Namespaces. Invite your teammates to enable true real-time collaboration. Each user is able to collaborate together on an application within a Development Environment all before any code is ever pushed. Test better together.
To share a Namespace go to the Okteto dashboard, select the Namespace you want to share and press the Share button in the Namespace menu (you'll find it in the main bar at the top).
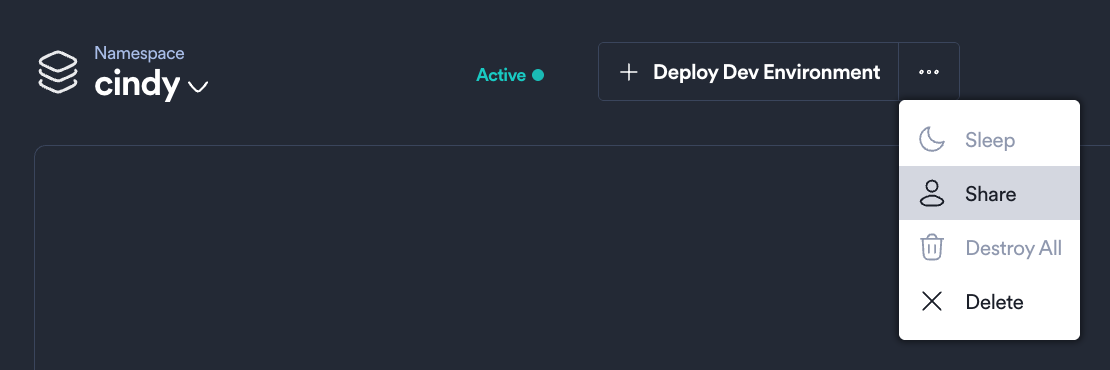
In the Share dialog, type the email address of the team members you want to share this Namespace with. Once you press save, Okteto will update the necessary permissions and notify your teammates via email.
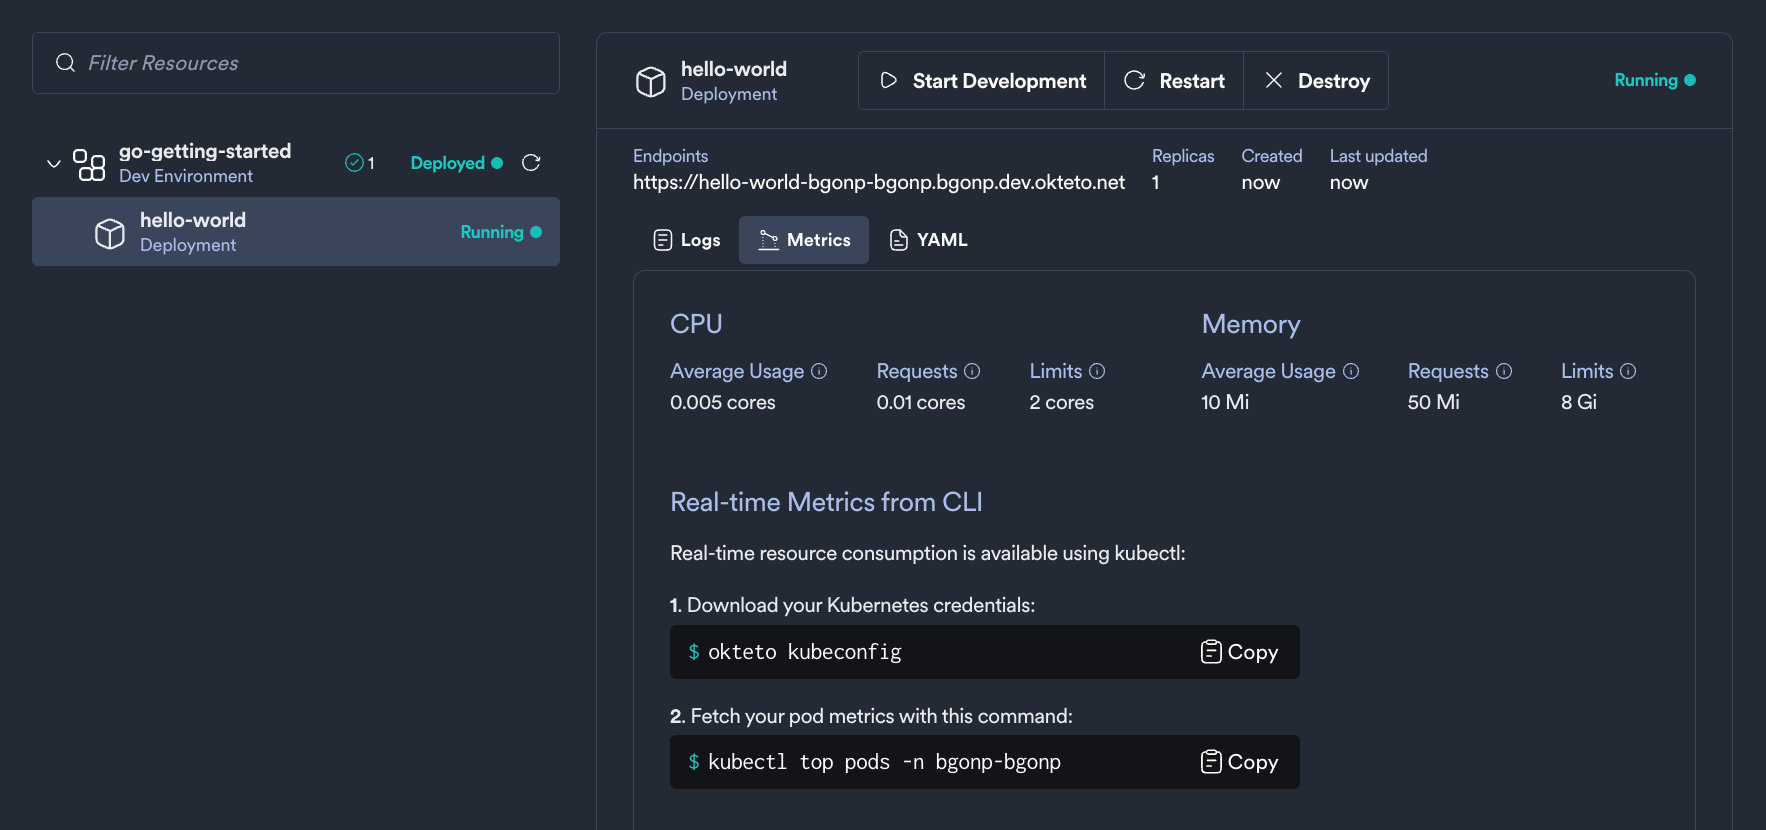
Viewing Resource Metrics and Recommendations
Resource Metrics View
With the addition of Resource Manager, there is a new “Metrics” tab in the Okteto Dashboard Namespace view. To access it, navigate to a Namespace, select a Development Environment’s Resource in the sidebar, and click on the Metrics tab below the endpoints. This view provides detailed insights into the resource usage and performance of your Kubernetes workloads.
The Metrics tab is available for core resources, including Deployments, StatefulSets, Jobs, CronJobs, and Pods.
If the Resource Manager is not enabled, the Metrics tab will display basic Storage and Pod metrics, along with a CLI guide to view metrics in real-time.
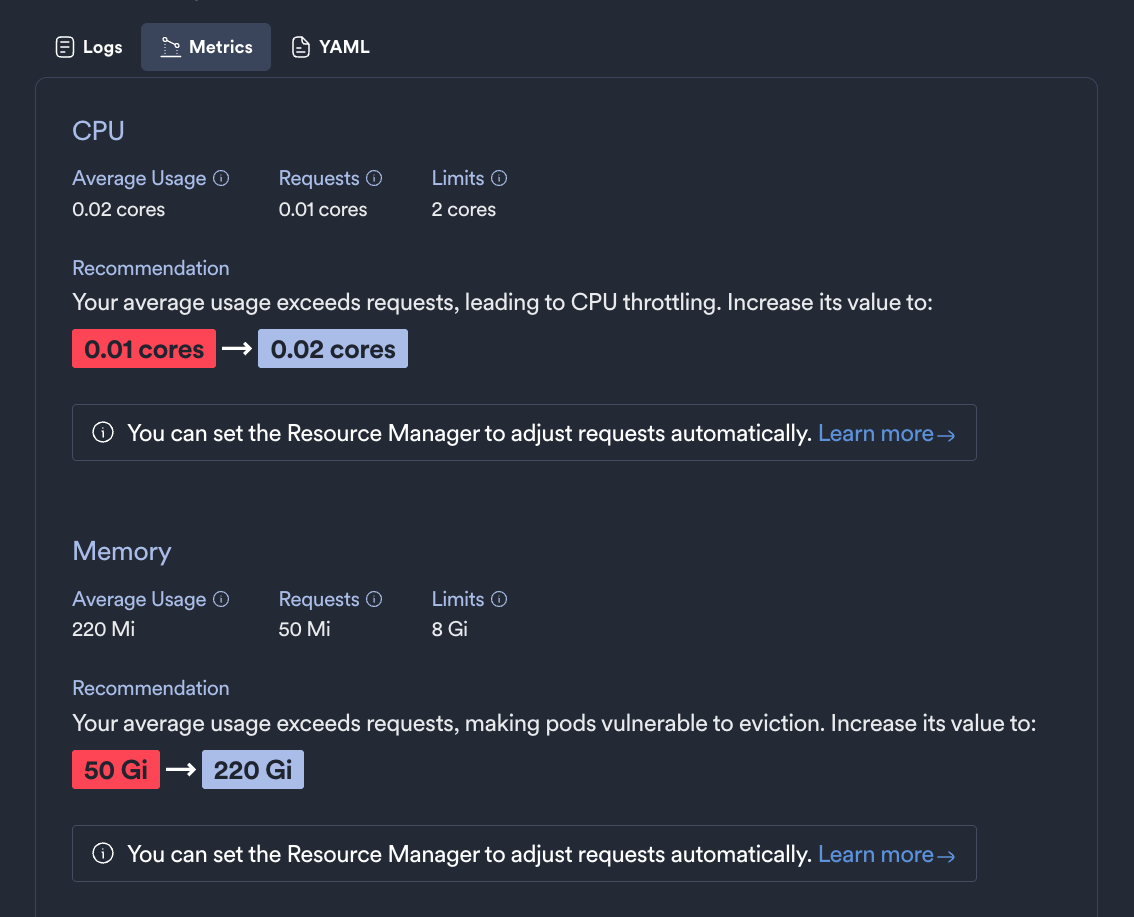
Metrics Tab View with Resource Manager Set to “Automatic”
-
Average CPU and Memory Usage: When set to Manual, the Resource Manager displays optimization recommendations for resource requests. These may suggest adjustments, such as increasing or decreasing CPU and memory requests based on observed usage patterns.
Metrics Tab View with Resource Manager Set to “Manual”
-
Resource Manager Recommendations: If the Resource Manager identifies opportunities for optimizing resource requests, it will display a recommendation. These recommendations might include increasing or decreasing CPU and memory requests based on the actual usage patterns.
Namespace Administration
The Okteto platform will take care of all the required RBAC roles and bindings, resources quotas and limits, and network policies so everyone in your team can safely deploy and develop applications in Kubernetes.
Through the Okteto Dashboard, Admins can perform all operations on any Namespace within the Okteto platform. This includes:
- Deleting, sharing, waking, sleeping, and marking Namespaces as persistent
- Deploying or deleting applications using both Okteto and
kubectl - Accessing all resources and sub-resources within any Development Environment
- Transferring Namespace ownership between developers
- Admins can fine tune a Developer access to Namespaces by configuring the
serviceAccountssection within the Okteto Helm configuration. - Configure cpu, memory, pods and storage quotas for each Namespace using the
quotassection within the Okteto Helm configuration.
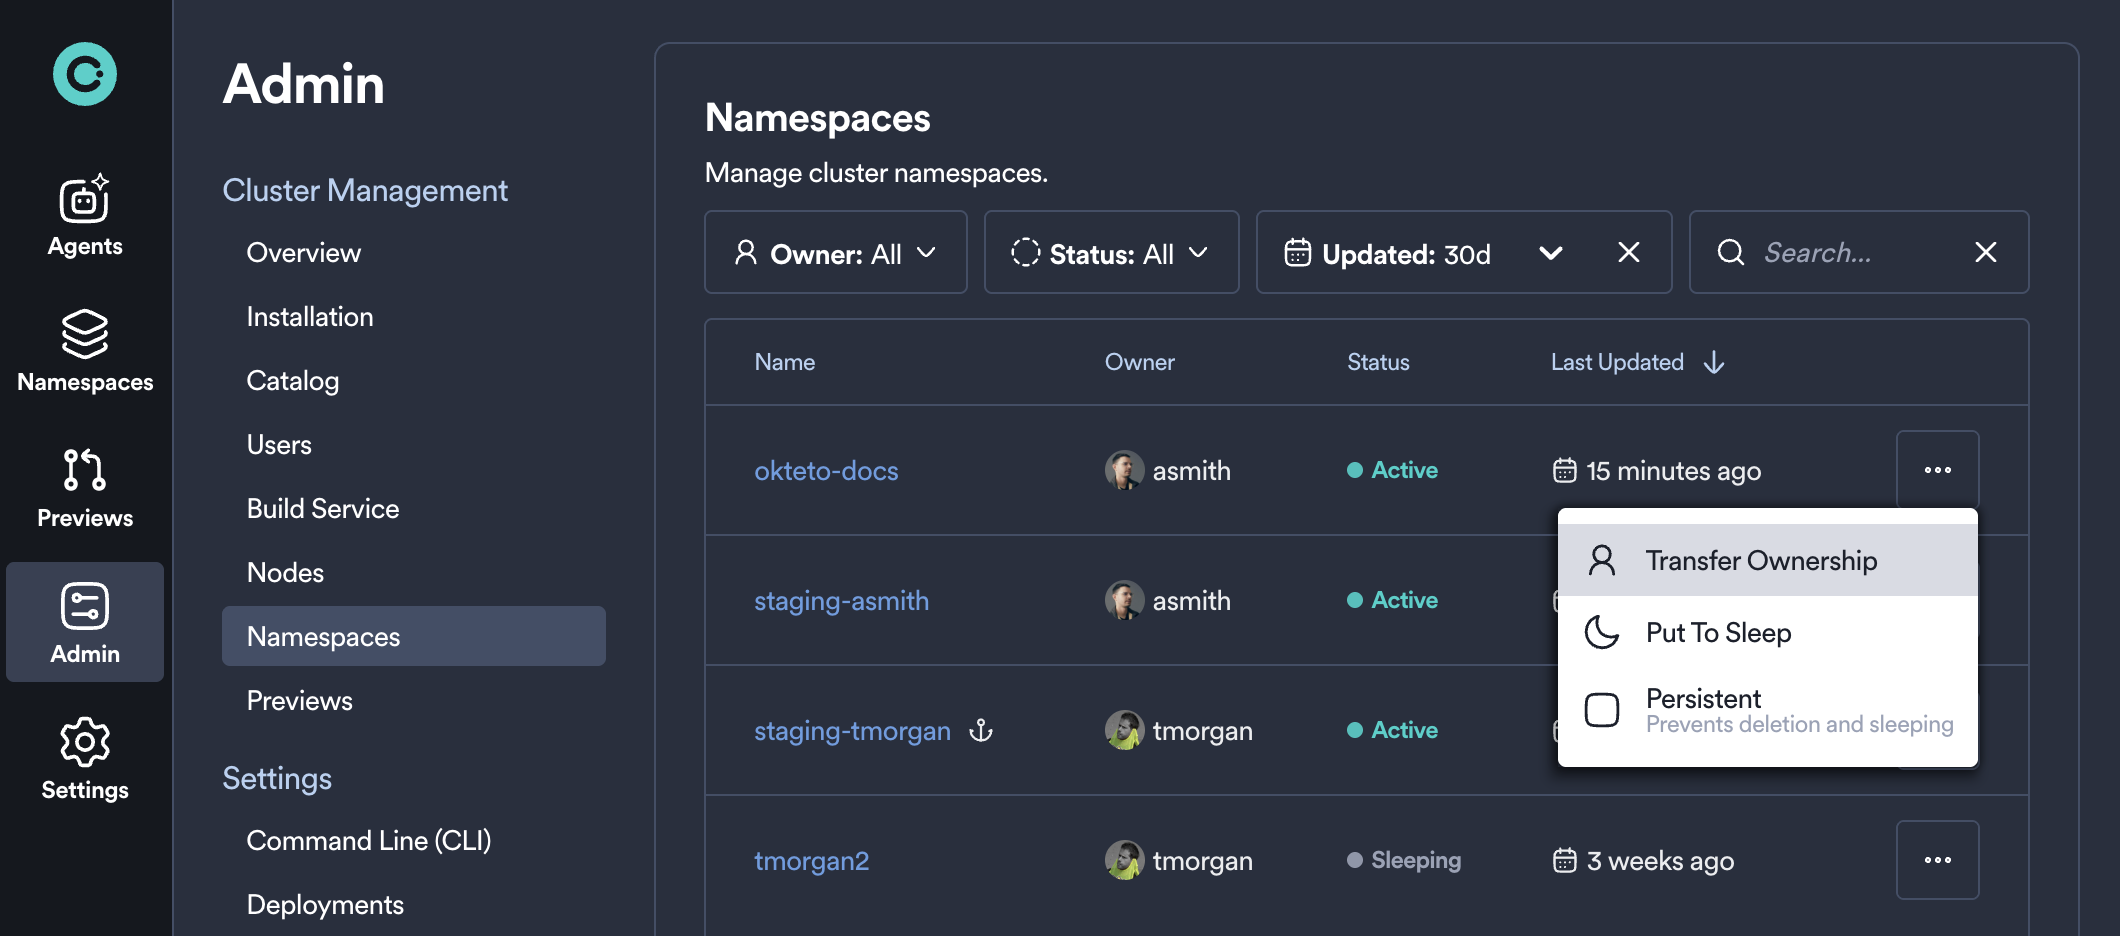
Transfer Namespace Ownership
Okteto administrators have the ability to transfer non-personal Namespaces between users. This process can be achieved through the Okteto UI and can be helpful for when you need to manually remove resources from an inactive user. Personal Namespaces that are tied to a user are unable to be transferred.
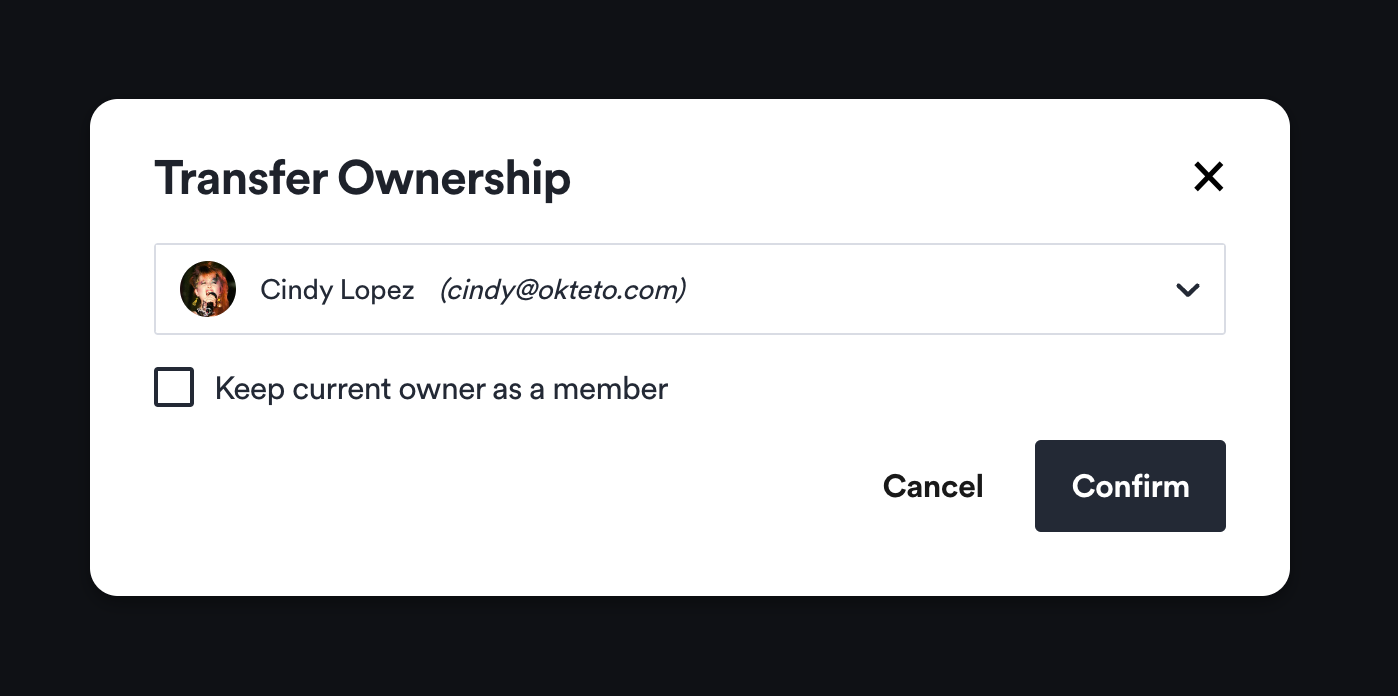
To transfer a Namespace to a new owner, go to the Okteto Dashboard -> Admin -> Namespaces under Cluster Management, then locate the Namespace that you would like to transfer. Click on the three dots ... to display the Namespace menu. From the Namespace menu select Transfer Ownership.
When the Transfer Ownership modal appears, type the email address of the team member who you'd like the transfer the Namespace to. Once you press confirm, ownership of that Namespace will be immediately transferred. If you wish, you can keep the current owner as a member of the Namespace by selecting the option in the Transfer Ownership modal. If this is not selected the current owner will immediately lose access.
User specific variables will not transfer along with a Namespace. If the Namespace being transferred has user specific variables, please note that future build or destroy actions may fail.
New user specific variables can be added to a transferred Namespace if desired to avoid future failures. Details on adding variables can be found here.
Mark a Namespace as Persistent to Prevent it from Sleeping and Deletion
Administrators can mark a Namespace as persistent using the Persistent option to prevent it from sleeping, being deleted, and exempt it from the garbage collection process.
To do so, navigate to the Okteto Dashboard -> Admin -> Namespaces under the Cluster Management section. Then locate the Namespace that you would like to mark as persistent. Click on the three dots ... to display the Namespace menu. From the Namespace menu select Persistent.
Garbage collection settings
The Okteto Garbage Collector service can automatically scale down idle applications and delete unused Namespaces for optimal cost savings and resource management.
Please see our resource cleanup guide to see the management options available and how to configure them.
Configure Namespace Quotas
Administrators can manage resource allocation by setting quotas for each Namespace. These quotas limit the maximum resources that can be used per Namespace.
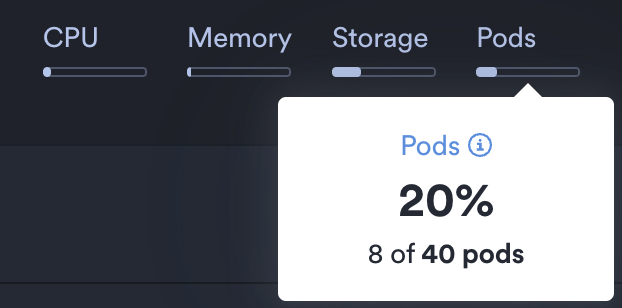
When enabled, the Okteto dashboard displays the following quotas on the Namespace view:
- CPU: Configured with
quotas.requests.cpu. Limits the total cpu resource requests per Namespace. - Memory: Configured with
quotas.requests.memory. Limits the total memory resource requests per Namespace. - Storage: Configured with
quotas.requests.storage. Limits the total volume storage per Namespace. - Pods: Configured with
quotas.resources.maxPods. Limits the total number of pods per Namespace.