Civo
This guide will walk you through the process of installing Okteto in Civo's Kubernetes Service.
Installation Requirements
Before you start, make sure you have the following CLIs installed in your machine:
okteto>= 3.9.0 (okteto installation guides)kubectl>= 1.28 (kubectl installation guides)helm>= 3.14 (helm installation guides)
You'll also need the following:
- An Okteto License
- A Domain and the ability to create wildcard DNS records for it
- A Kubernetes cluster
Getting your Okteto License
A license is mandatory to use Okteto. You'll receive a license key as part of your subscription to Okteto. If you haven't received it, please open a support ticket.
If you are interested in evaluating Okteto, sign up for our free 30 days trial. No credit card required.
A Domain and the ability to create wildcard DNS records for it
You'll need sufficient access to a subdomain to add a wildcard DNS record, such as dev.example.com. By default, all endpoints created by Okteto for your development environments will be exposed on the wildcard subdomain you choose.
This guide assumes your domain is registered in Civo DNS. You can use any DNS service you prefer, but this guide focuses specifically on Civo DNS.
Deploy a Kubernetes cluster
If you are not familiar with this step, we recommend that you follow Civo's cluster creation guide.
Okteto supports Kubernetes versions 1.30 through 1.32. To get started with Okteto, we recommend that you create a Kubernetes cluster with the following configuration:
- Kubernetes v1.32
- 3 large nodes
- Default network
- Without Traefik (you'll need to remove it from the default apps)
Installing Okteto
Okteto is installed using a Helm chart. Let's start the process:
Add the Okteto Helm repository
You'll need to add the Okteto Helm repository to be able to install Okteto:
helm repo add okteto https://charts.okteto.com
helm repo update
Create the Helm configuration file
In order to install Okteto you need to first create a config.yaml for the installation process.
Replace license and subdomain with your own values, and initialize your Helm configuration file with these settings:
license: "REPLACE ME WITH YOUR OKTETO LICENSE"
subdomain: "REPLACE ME WITH YOUR OKTETO DOMAIN"
Note: This is the minimum configuration. Check our Helm configuration docs to learn more
Installing the Okteto Helm chart
Install the latest version of Okteto by running:
helm upgrade --install okteto okteto/okteto -f config.yaml --namespace=okteto --create-namespace --version=1.34.0
After a few seconds, all the resources will be created. The output will look something like this:
Release "okteto" has been installed. Happy Helming!
NAME: okteto
LAST DEPLOYED: Thu Mar 26 18:07:55 2020
NAMESPACE: okteto
STATUS: deployed
Retrieve the Ingress Controller IP address
You can use kubectl to fetch the address that has been dynamically allocated by Civo to the NGINX Ingress you've just installed and configured as a part of Okteto:
kubectl get service -l=app.kubernetes.io/name=ingress-nginx,app.kubernetes.io/component=controller --namespace=okteto
The output will look something like this:
NAME                             TYPE           CLUSTER-IP     EXTERNAL-IP     PORT(S)                                     AGE
okteto-ingress-nginx-controller  LoadBalancer   10.245.147.23  91.211.154.196  80:30087/TCP,443:31799/TCP,1234:31412/TC    2m
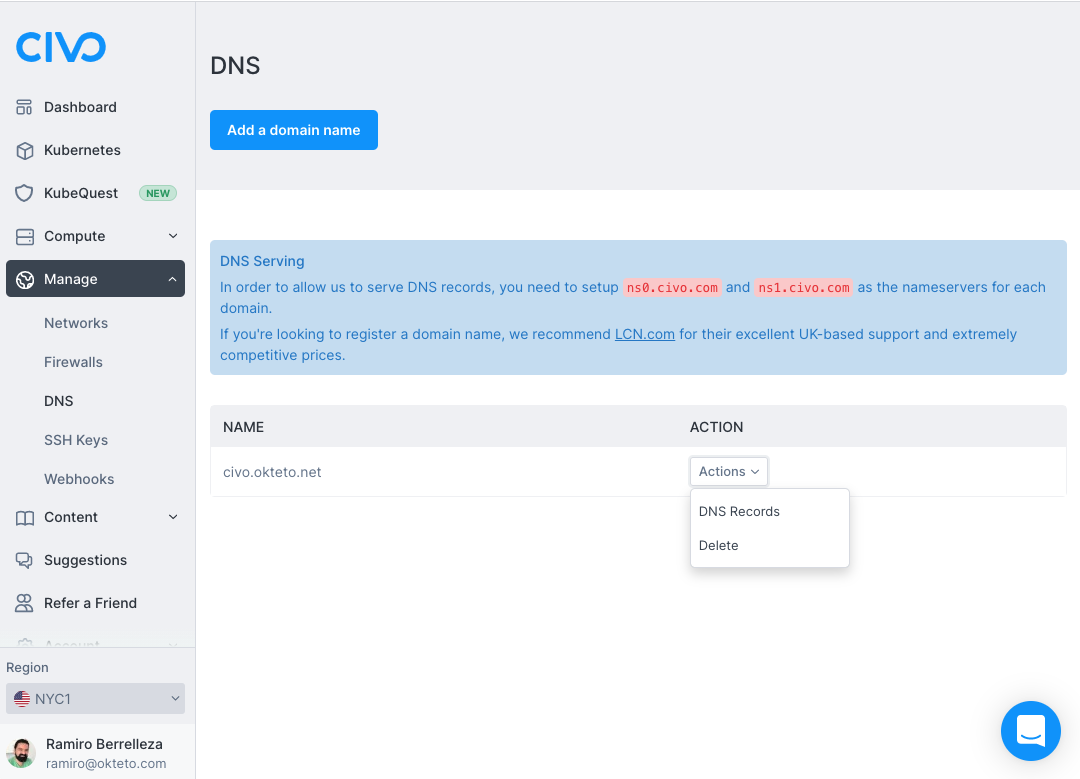
You'll need to create a wildcard DNS record for this IP. To do that, log in to your Civo account, click on the "Manage" option on the left part of the dashboard, and click on "DNS".
Select the domain you're using for your Okteto instance, and click on the "DNS Records" option.
Click on the "Add a Record" button and use the following values:
- Type: A
- Name: *
- Value: Your EXTERNAL-IP
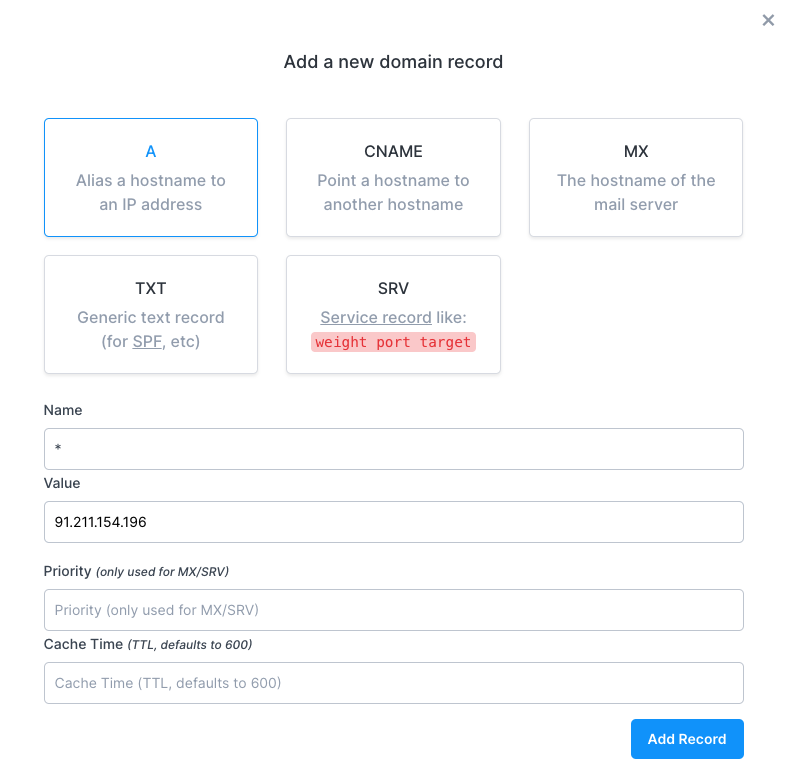
Click on the "Add Record" button to create the DNS record.
Sign in to your Okteto instance
Important: The default installation is not recommended for production use. We highly advise configuring a wildcard certificate after finishing your evaluation and giving your team access to your Okteto instance.
After a successful installation, you can access your Okteto instance at https://okteto.SUBDOMAIN. Your account will be automatically created as part of the login process. The first user to successfully login into the instance will be automatically assigned the administrator role.
Configure the Okteto CLI
Install the Okteto CLI if you haven't done it yet and set the Okteto CLI context with your Okteto instance.
To do this, run the command below replacing SUBDOMAIN:
okteto context use https://okteto.SUBDOMAIN
Once your Okteto instance is up and running, you are going to deploy your first app to Okteto 😎