How to Develop Django and Postgres Applications with Docker and Okteto CLI 2.0

Doesn’t it bother you that you cannot build your application and see how it looks and behaves in production when developing it?
If it does, then you have come to the right place. In this article, you will learn how to set up Docker and Docker compose to build a Django image with the Postgres database. You will then learn how to build a Django application on Okteto to view the project in a production environment as you build. For the Django application, to keep things simple, you will build an API for contact lists.
Okteto's Development Environments allow you to develop your applications directly in a Kubernetes cluster. This way you can be sure what you see is what you'll get when you push to production.
Prerequisites
- Basic understanding of Django framework
- An Okteto Cloud account (It’s free!)
- Docker and Docker Compose installed
Initialize Django Project
Before you get started, create a project directory to contain your application:
$ mkdir django-docker-okteto
$ cd django-docker-okteto
Now run the following command to create a new Django project:
$ django-admin startproject contact_list .
Finally, run the following command to create a Django app:
$ python3 manage.py startapp app
Add the app you just created to the settings.py:
INSTALLED_APPS = [
     ...
    'django.contrib.staticfiles',
    'app',
    'rest_framework', #needed to create the API
]
Now, you need to make some more changes to the settings.py file in order for your Django application to accept the Docker compose host and connect with Postgres.
Add the Docker compose host to Django by adding 0.0.0.0 to ALLOWED_HOST in the settings.py file, since that is the host Docker compose runs on.
ALLOWED_HOSTS = ['0.0.0.0']
For the database configuration, delete the DATABASE dictionary you have in your setting.py file and paste the code below. In a later section, you will set the credentials for the environment variables in the Docker compose file.
DATABASES = {
  'default': {
    'ENGINE': 'django.db.backends.postgresql',
    'HOST': os.environ.get('DB_HOST'),
    'NAME': os.environ.get('DB_NAME'),
    'USER': os.environ.get('DB_USER'),
    'PASSWORD': os.environ.get('DB_PASS'),
  }
}
Import the os module used in the code above by adding import os at the top of your settings.py file.
Creating a Dockerfile to Build the Django Application
Dockerfile is a file where you write instructions of how you want your Docker image to be. You can get started by creating a Dockerfile that will contain the instructions for building your Django application image:
$ touch Dockerfile
Now add the following to the file:
FROM python:3.7-alpine

ENV PYTHONUNBUFFERED 1
RUN mkdir /django-docker-okteto
WORKDIR /django-docker-okteto
COPY . .
RUN apk add --update --no-cache postgresql-client jpeg-dev
RUN apk add --update --no-cache --virtual .tmp-build-deps \\
      gcc libc-dev linux-headers postgresql-dev musl-dev zlib zlib-dev
RUN pip install -r requirements.txt

RUN adduser -D user
USER user
If you are unfamiliar with Docker, here is the description of the instructions.
FROM: This is used at the beginning of every Dockerfile. It is used to tell Docker what image in Docker hub your image should be built under.
ENV: Used to state environment variables.
PYTHONUNBUFFERED 1: tells Python to display all outputs in real-time.
RUN: Used to run terminal commands. In the code above, it is used to create a new directory in the image, and we later use it to install dependencies.
WORKDIR: Used to make a directory a working directory. All commands will be run from the working directory.
COPY: Used to copy files, here it’ll copy files from local directory to working directory in images
Now, create the requirements.txt file that will contain a list of dependencies to run the application. Create the file at the root of your project and input the text below. The Django REST framework will be used to build the API, so it needs to be installed too. psycopg2-binary is required by Django to run the Postgres database.
django==3.1.2
djangorestframework==3.13.1
psycopg2-binary
Building Docker Compose File to Run Django and PostgreSQL
Since you will be using more than one service (Python, Postgres) in this project, it makes more sense to use Docker Compose to manage them. Docker Compose enables you to manage and build and run different Docker images together. In Docker compose, each image is considered a service. To start, create a new file named docker-compose.yaml that will contain the instructions for building your Django application and Postgres image together:
$ touch docker-compose.yaml
Now add the following to the file. Some comments have been added to the file to describe what each step is doing.
# Version of docker-compose to use
version: "3"

services:
  app: # This is the service for the Django application
    build:
      context: . # Sets the directory containing a Dockerfile .

    # Maps port on the local machine to port on Docker image
    ports:
      - "8080:8080"

    volumes:
    # Copy changes made to the project to your image working directory as changes are made.
      - .:/django-docker-okteto

    environment:
      # The environment variable credentials that is needed
      # in django settings for Postgres to work.
      - DB_HOST=pg
      - DB_NAME=app2
      - DB_USER=postgres3
      - DB_PASS=supersecretpassword
    depends_on:
      - pg

  pg:
    image: postgres:10-alpine # pulling Postgres image from Docker hub
    environment:
      # credentials required by postgres image
      - POSTGRES_DB=app2
      - POSTGRES_USER=postgres3
      - POSTGRES_PASSWORD=supersecretpassword
Build the Application in Okteto
Before you begin this section, install Okteto CLI to use Okteto's Remote Development Environments. After installation, you will be provided with version 2.0^ by default. You can check the version of Okteto you installed by running okteto version.
Set up your Okteto development environment for Django
Deploy your app to Okteto cloud by running the command below. The following command will create the development environment required for your application to run using instructions stated in docker-compose.yaml file.
$ okteto deploy --build
We added the --build flag to force the build of images so the application can run.
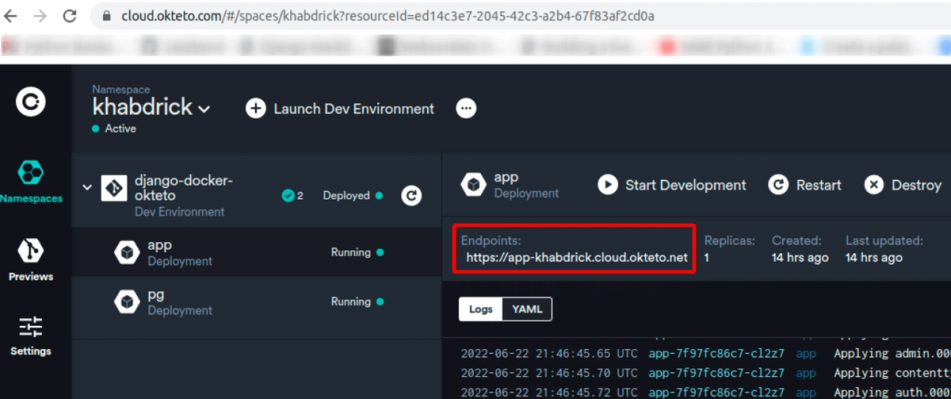
Go to Okteto cloud, after the build and deployment are complete you will be provided with the URL you can use to access your application. Open it in a browser, and you will see that your application is running.

Now run the following command to connect your local machine to Okteto cloud so that it can receive changes made locally in real-time. This command performs an SSH connection to the server running your application on Okteto cloud and provides a watcher service to keep the definition of the original deployment up to date with the mirror deployment.
$ okteto up
Now, any changes you make to your code locally will be updated in the app URL on Okteto. When the update is made, you will see that the changes are automatically synchronized with the application on the cloud, and you can see the effect of your changes in real-time.
Develop Django Application
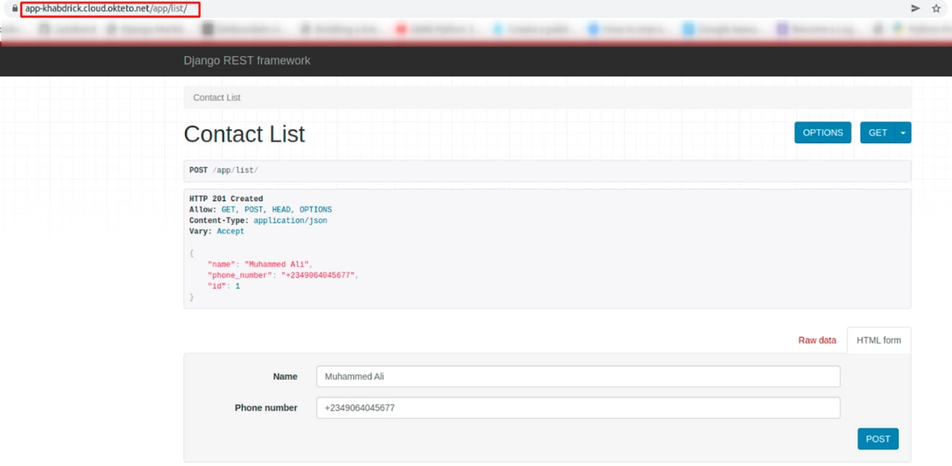
Here we will build a contact list application to test out the functionalities of Okteto.
Open contact_list/urls.py and add a route to the app you have created by updating the urlpatterns list.
from django.urls import path, include

urlpatterns = [
    path('admin/', admin.site.urls),
    path('app/', include("app.urls"))] #route for new app
Now, open app/models.py and populate it with the code below. The following code contains the database fields for contacts.
from django.db import models

class ContactList(models.Model):
    name = models.CharField(max_length=200)
    phone_number = models.CharField(max_length=200)
    def __str__(self):
        return self.name
Create a new file, app/serializers.py, and paste the following code. The code below converts the data gotten from the database into JSON and back to its original form.
from rest_framework import serializers
from .models import ContactList

class ContactListSerializer(serializers.ModelSerializer):
    class Meta:
        model = ContactList
        fields = ('name', 'phone_number',"id") # fields in the models
Next, create the view for saving and listing out contacts in the database. You can do this by pasting the following code in app/views.py.
from rest_framework import generics
from rest_framework import status
from rest_framework.decorators import api_view
from .serializers import ContactListSerializer
from rest_framework.response import Response
from .models import ContactList

@api_view(['POST'])
def create_contact(request):
        # create coontact
    contact = ContactListSerializer(data=request.data)
    if contact.is_valid():
        contact.save()
        return Response(contact.data)
    else:
        return Response(status=status.HTTP_404_NOT_FOUND)

class ContactListView(generics.ListCreateAPIView):
    # list out contacts
    queryset = ContactList.objects.all()
    serializer_class = ContactListSerializer
Finally, create a new file app/urls.py and paste the code below to set the routing for the views.
from . import views
from django.urls import path

urlpatterns = [
    path('create/', views.create_contact, name='create-items'),
    path('list/', views.ContactListView.as_view(), name='view-contacts'),]
Since you have made changes to the model, you need to run the python manage.py makemigrations and python manage.py migrate commands. You should run these commands in the terminal provided to you by Okteto when you run okteto up. After the migrations are complete, run the Django server with the following command:
python manage.py runserver
Now you will be able to access the paths you just created on the endpoint provided by Okteto.

Conclusion
In this guide, you were able to learn how to set up Docker and Docker compose to build a Django image with the Postgres database. You then went through activating Okteto's development environment and built a Django application on Okteto to view the project in a production environment as you build.
You can utilize the knowledge obtained in this tutorial and improve on it by adding microservices like Redis, Celery, or any other tool you need when building your application.


 Mercy Bassey

 Arsh Sharma