Deploying a Django App on Okteto

An RBAS system helps manage users and prevents certain information from being exposed to everyone. It also ensures that the actions users can perform can be grouped based on roles. In this article, we will be building and deploying a Django Role-based Authorization Service(RBAS) API on Okteto.
What is Okteto ?
Okteto is a developer platform powered by Kubernetes that enables anyone to develop and deploy cloud-native applications.
What is Django?
Django is a high-level Python Web framework very well suited for building APIs. Django comes with a lot of out of the box functionality, making your development faster and easier.
Prerequisites
- Knowledge of building APIs
- Basic Knowledge of Django
- Basic Knowledge of Cloud Infrastructure
- Python 3.7+ installed
Scaffold Project
To start building, we will first create and activate a virtual environment for our project:
$ python3 -m venv venv
$ source venv/bin/activate
Next, we install Django:
(venv)$ pip install django
With Django installed, go ahead and run the django-admin command. This command from Django helps bootstrap your project, creating essential directories and files to get started.
(venv)$ django-admin startproject simple_rbas
Navigate into the new project created:
(venv)$ cd simple_rbas
Create a requirements.txt file in the root folder and add the following packages:
django
djangorestframework
django-environ
psycopg2-binary
gunicorn
Install the packages using the pip command:
(venv)$ pip install -r requirements.txt
The django-environ package is used to connect to .env files, psycopg2-binary is used to connect Django to a Postgres database, and gunicorn is used in running our server for development and production.
Verify that the application has been successfully created by running the command:
(venv)$ python manage.py runserver
Development
In this section, we will be building up our model, serializers, permissions for our views, and routing to our views. We will also be setting up our Dockerfile, and Okteto stack manifest file for our project.
Setting Up Project
To get started with building our app, we’ll create an app inside our project. Run this command inside your project directory:
(venv)$ python manage.py startapp users
This command creates a new directory named users in your project directory, looking like this:
├──users
  ├── migrations
    ├── __init__.py
  ├── __init__.py
  ├── admin.py
  ├── apps.py
  ├── models.py
  ├── tests.py
  ├── views.py
For our authentication, we will be using http-only cookies and not localStorage, to set our authentication. It is recommended to use http-only-cookies to reduce the risk of haivng security issues.
We will be creating an authentication middleware for the project. Django provides us with middleware for authenticating users, but we will override and create our middleware because we will be using cookies. Create a new file backends.py and paste the code below into it:
from datetime import datetime, timedelta
from django.contrib.auth import get_user_model
from django.middleware.csrf import CsrfViewMiddleware
from django.contrib.auth.tokens import PasswordResetTokenGenerator
from django.conf import settings
from django.urls import reverse
from django.utils.encoding import force_text, force_bytes
from django.utils.http import urlsafe_base64_encode, urlsafe_base64_decode
from django.contrib.auth import get_user_model
from rest_framework import exceptions
from rest_framework.authentication import BaseAuthentication
from jose import JWTError, jwt

User = get_user_model()
ENCRYPTION_ALGORITHM = "HS256"

def generate_jwt_token(data, min_to_expire=None):
    """
    Generates and returns account token with expiration of min_to_expire minutes
    :param data:
    :param min_to_expire:
    Returns:
    """
    payload = data.copy()
    if min_to_expire is None:
        min_to_expire = 15
    expire = datetime.utcnow() + timedelta(minutes=min_to_expire)
    payload.update({"exp": expire})
    token = jwt.encode(payload, settings.SECRET_KEY, algorithm=ENCRYPTION_ALGORITHM)
    return token

def decrypt_jwt_token(token):
    """
    Decrypts authentication token and returns content
    :param token:
    :return:
    """
    try:
        payload = jwt.decode(token, settings.SECRET_KEY)
    except JWTError:
        payload = None
    return payload

class CSRFCheck(CsrfViewMiddleware):
    def _reject(self, request, reason):
        """
        We are returning the failure reason instead of an HttpResponse
        :param request:
        :param reason:
        :return:
        """
        return reason

class SafeJWTAuthentication(BaseAuthentication):
    """
    Custom Authentication Class that authenticates users from cookies (http-only)
    instead of from Authorization key in headers
    """
    def authenticate(self, request):
        """
        Is required to be implemented (from BaseAuthentication)
        :param request:
        :return:
        """
        authorization_cookie = request.COOKIES.get("Authorization") or request.headers.get("Authorization")
        if not authorization_cookie:
            return None
        try:
            access_token = authorization_cookie.split(" ")[1]
            payload = decrypt_jwt_token(access_token)
        except JWTError:
            return None
        if not payload:
            return None
        user = User.objects.filter(id=payload["user_id"]).first()
        if user is None:
            raise exceptions.AuthenticationFailed("User not found")
        if not user.is_active:
            raise exceptions.AuthenticationFailed("User is inactive")
        self.enforce_csrf(request)
        return user, None
    def enforce_csrf(self, request):
        """
        Enforces CSRF Validation
        :param request:
        :return:
        """
        return
In the code block above, generate_jwt_token() is a function that the application will use in generating a jwt_token once the user has been authenticated. On the other hand, decrypt_jwt_token() is used in our authentication middleware and SafeJWTAuthentication is used to get the user data when a user accesses an endpoint.
Next, we will be adding our authentication middleware to our configuration.
In simple_rbas/settings.py, add the following changes:
from pathlib import Path

import environ

ROOT_DIR = (
    environ.Path(__file__) - 2
)

# Build paths inside the project like this: BASE_DIR / 'subdir'.

BASE_DIR = Path(__file__).resolve().parent.parent

env = environ.Env(
    # set casting, default value
    DEBUG=(bool, False),
)

# Build paths inside the project like this: BASE_DIR / 'subdir'.

BASE_DIR = Path(__file__).resolve().parent.parent
READ_DOT_ENV_FILE = env.bool("DJANGO_READ_DOT_ENV_FILE", default=True)

if READ_DOT_ENV_FILE:

    # OS environment variables take precedence over variables from .env
    env.read_env(str(ROOT_DIR.path(".env")))
In the code block above, we are specifying the directory the .env file we will be creating.
Create a .env file in your root directory:
(venv)$ touch .env
Add the following to the .env file:
SECRET_KEY=fake-secret-key
DEBUG=True
COOKIE_SECURE=False
Replace fake-secret-key with the SECRET_KEY value in settings.py.
Our
envkeys will only be used for local development.
Change the SECRET_KEY and DEBUG variable in settings.py;
# SECURITY WARNING: keep the secret key used in production secret!
SECRET_KEY = env.str("SECRET_KEY")

# SECURITY WARNING: don't run with debug turned on in production!
DEBUG = env.bool("DEBUG")

ALLOWED_HOSTS = ['*']
Next, add the users app to the INSTALLED_APPS list:
INSTALLED_APPS = [
    'django.contrib.admin',
    'django.contrib.auth',
    'django.contrib.contenttypes',
    'django.contrib.sessions',
    'django.contrib.messages',
    'django.contrib.staticfiles',
    'users'
]
Change the DATABASE variable:
DATABASES = {"default": env.db("DATABASE_URL", default= "sqlite:////" + str(BASE_DIR) + '/db.sqlite3')}
Finally, add the following lines at the end of the file;
AUTH_USER_MODEL = "users.User"

REST_FRAMEWORK = {
    'DEFAULT_AUTHENTICATION_CLASSES': [
        "users.backends.SafeJWTAuthentication",
        # 'rest_framework.authentication.BasicAuthentication',
        # 'rest_framework.authentication.SessionAuthentication',
    ],
    "DEFAULT_SCHEMA_CLASS": "rest_framework.schemas.coreapi.AutoSchema",
    "DEFAULT_FILTER_BACKENDS": (
        "rest_framework.filters.SearchFilter",
    ),
    "DATETIME_FORMAT": "%Y-%m-%dT%H:%M:%S.%fZ",
}

# COOKIE SECURE FLAG
COOKIE_SECURE = env.bool("COOKIE_SECURE")
COOKIE_TIME = 1800
In the code block above, we are configuring the Django rest framework settings, setting AUTH_USER_MODEL to the User class we will create in the users app, and adding COOKIE_TIME and COOKIE_SECURE to be false in local and true in our Docker production.
Setting Up Docker and Okteto
We will start by creating a bash script, run_web.sh, that creates our migration files, runs migrations, and then starts our server.
#!/bin/sh

# prepare init migration

python manage.py makemigrations myproject
echo "Created migrations"

# migrate db, so we have the latest db schema

python manage.py migrate
echo "Migrated DB to latest version"

#start server

echo "Starting server"
gunicorn simple_rbas.wsgi
Next, create a Dockerfile in the root folder add the following:
FROM python:3.9-buster

RUN mkdir /simple_rbas
RUN pip install -U pip

COPY ./requirements.txt ./simple_rbas/requirements.txt
RUN pip install --no-compile  -r /simple_rbas/requirements.txt

ENV PYTHONWARNINGS ignore
ENV PYTHONDONTWRITEBYTECODE=true
ENV PYTHONUNBUFFERED 1
ENV PATH="${PATH}:/root/.local/bin"
ENV PYTHONPATH=.

COPY . /simple_rbas/

WORKDIR /simple_rbas
CMD ["run_web.sh"]
Create a docker-compose.yml, and add the following lines:
name: simple-rbas
services:
  rbas-db:
    image: postgres:11
    ports:
      - 5432
    environment:
      - POSTGRES_USER=pguser
      - POSTGRES_PASSWORD=pgpass
      - POSTGRES_DB=pgdb
    resources:
      cpu: 100m
      memory: 128Mi

  simple-rbas:
    public: true
      image:okteto.dev/simple-rbas:latest
    build: .
    replicas: 1
    command: bash -c "gunicorn simple_rbas.wsgi --reload -b 0.0.0.0:8000"
    ports:
      - 8000
    resources:
      cpu: 100m
      memory: 128Mi
    env_file:
        - .env
    environment:
        - DJANGO_READ_DOT_ENV_FILE=true
        - DATABASE_URL=postgresql://pguser:pgpass@notes-db:5432/pgdb
        - COOKIE_SECURE=true
        - DEBUG=false
In the docker-compose.yml file, we are configuring two services:
rbas-dbfor our database.simple-rbasour web API.
Our services are linked together through the DATABASE_URL, and both services are exposed to a specific port, 5432 and 8000.
The rbas-db is created from the postgres11 image, and simple-rbas is based on the image created by our Dockerfile.
And with this, we're good to go because Okteto allows you to spin dev environments directly without requiring an Okteto Manifest if you have a Docker compose file defined for your application.
Initializing Models and Permissions
In users/models.py, add the following lines:
from django.contrib.auth.models import AbstractUser
from django.db import models


class User(AbstractUser):
    OWNER = 0
    INVESTOR = 1
    ADMIN = 2
    WRITE = 3
    READ_ONLY = 4
    LEVEL_CHOICES = (
        (OWNER, "Owner"),
        (INVESTOR, "Investor"),
        (ADMIN, "Admin"),
        (WRITE, "Read/Write"),
        (READ_ONLY, "Read Only"),
    )
    level = models.SmallIntegerField(choices=LEVEL_CHOICES, db_index=True, default=READ_ONLY)
The user’s level property will determine authorization on the API. Only Owner users can have access to all views.
. Only users with the Owner property can have access to all views.
Next, create a users/serializers.py file to serialize and deserialize responses and requests for our users when signing up.
import django.contrib.auth.password_validation as validators
from django.contrib.auth import get_user_model
from django.core import exceptions

from rest_framework import serializers

User = get_user_model()

class SignUpSerializer(serializers.Serializer):
    email = serializers.EmailField()
    first_name = serializers.CharField()
    last_name = serializers.CharField()
    username = serializers.CharField()
    level = serializers.IntegerField(required=False)
    password = serializers.CharField(trim_whitespace=False)
    def validate_email(self, email):
        """
        Raises exception if email already exist
        :return:
        """

        try:
            user = User.objects.get(email=email)
            if user.is_active:
                raise serializers.ValidationError("user with that email already exists")
        except User.DoesNotExist:
            return email
    def create(self, validated_data):
        """
        Create the user at DB level
        :param validated_data:
        :return:
        """

        level = validated_data.get("level")
        email = validated_data.get("email")
        self.validate_email(email)

        if level > 4 or level < 0:
            raise serializers.ValidationError("level does not exist")
        user = User.objects.create_user(**validated_data)
        return user

class UserSerializer(serializers.ModelSerializer):
    class Meta:
        model = User
        fields = ("username", "email", "first_name", "last_name", "level",)
Next create a permissions.py file in the users directory and add the following:
from rest_framework import permissions

class OnlyStaffOwnerUserPermission(permissions.BasePermission):
    """
    Custom user API permissions.
    - Normal users can't send requests
    - Staff and Owner can do everything
    """

    message = 'Only Staff or Owner Users can access this endpoint.'
    def has_permission(self, request, view):
        allowed_level = {0, 2, 3,}
        return request.user.level in allowed_level

class OnlyAdminOwnerUserPermission(permissions.BasePermission):
    """
    Custom user API permissions.
    - Normal users can't send requests
    - Staff, Investor and Owner can do everything
    """

    message = 'Only Admin Staff or Owner Users can access this endpoint.'
    def has_permission(self, request, view):
        return request.user.level == 2 or request.user.level == 0

class OnlyInvestorOwnerUserPermission(permissions.BasePermission):
    """
    Custom user API permissions.
    - Normal users can't send requests
    - Investor and Owners can do everything
    """

    message = 'Only Investors or Owners can access this endpoint.'
    def has_permission(self, request, view):
        return request.user.level <= 1

class OnlyOwnerUserPermission(permissions.BasePermission):
    """
    Custom user API permissions.
    - Normal users can't send requests
    - Owners can do everything
    """

    message = 'Only Owners can access this endpoint.'
    def has_permission(self, request, view):
        return request.user.level == 0
Each permission class will be added to our views to allow only users with matching levels to access the endpoints and throwing the message when the user level doesn’t fit.
Views and Routing
In this section, we will create the views for each of the available roles and then route each view to an endpoint.
Add the following in the users/views.py file:
from django.conf import settings
from django.contrib.auth import authenticate
from django.contrib.auth import get_user_model

from rest_framework.permissions import IsAuthenticated
from rest_framework.response import Response
from rest_framework import status
from rest_framework.viewsets import GenericViewSet

from users.serializers import SignUpSerializer, UserSerializer
from users.permissions import (
    OnlyStaffOwnerUserPermission,
    OnlyAdminOwnerUserPermission,
    OnlyInvestorOwnerUserPermission,
    OnlyOwnerUserPermission
)
from users.backends import generate_jwt_token

User = get_user_model()

class SignUpView(GenericViewSet):
    def create(self, request):
        """
        Create User,
        """
        serializer = SignUpSerializer(data=request.data)
        if not serializer.is_valid():
            return Response({"error": serializer.errors, "success": False}, status=status.HTTP_403_FORBIDDEN)
        user = serializer.save()
        user_serializer = UserSerializer(user)
        return Response(
            {"user": user_serializer.data, "success": True},
            status=status.HTTP_201_CREATED,
        )

class LoginView(GenericViewSet):
    def login(self, request):
        """
        Login User and return authentication token (POST REQUEST)
        :param request:
        :return:
        """
        username = request.data.get("username")
        password = request.data.get("password")
        user = authenticate(username=username, password=password)
        if not user:
            return Response({"error": "Invalid Credentials", "success": False}, status=status.HTTP_401_UNAUTHORIZED)
        token = generate_jwt_token({"user_id": user.pk}, min_to_expire=1800)
        content = {
            "success": True,
            "message": "You've successfully logged in",
            "email": user.email,
            "user_level": user.level,
            "token": f"Bearer {token}",
            "user_id": user.id,
        }
        response = Response(data=content, status=status.HTTP_200_OK)
        response.set_cookie(
            "Authorization",
            value=f"Bearer {token}",
            httponly=True,
            max_age=settings.COOKIE_TIME,
            expires=settings.COOKIE_TIME,
            samesite="None",
            secure=settings.COOKIE_SECURE, # Cookie is sent from client only over HTTP when flag turned on
        )
        return response
The SignUpView is called for creating new users and roles in the system. The LogInView is used in authenticating users in the system. Although the token is sent back as a response, it is not used because it is also sent as a cookie to be read by the browser or postman.
class AllUser(GenericViewSet):
    def get(self, request):
        message = "Every User can visit this url, even unsigned users"

        return Response(
            {"message": message , "success": True},
            status=status.HTTP_200_OK,
        )

class OnlyAuthenticatedUser(GenericViewSet):
    permission_classes = [IsAuthenticated]
    def get(self, request):
        user = User.objects.get(username=request.user.username)
        user_serializer = UserSerializer(user)
        message = "Every authenticated user have access here"
        return Response(
            {"user": user_serializer.data, "message": message, "success": True},
            status=status.HTTP_200_OK,
        )
The AllUser class view accepts every user who hits the endpoint, signed up or not, and OnlyAuthenticatedUser class is accessible to only signed up and authenticated users. This is made available by the IsAuthenticated permission.
class OnlyStaffOwnerUser(GenericViewSet):
    permission_classes = [IsAuthenticated, OnlyStaffOwnerUserPermission]
    def get(self, request):
        user = User.objects.get(username=request.user.username)
        user_serializer = UserSerializer(user)
        message = "You can only see this if you're a staff or owner"
        return Response(
            {"user": user_serializer.data, "message": message, "success": True},
            status=status.HTTP_200_OK,
        )

class OnlyAdminStaffOwnerUser(GenericViewSet):
    permission_classes = [IsAuthenticated, OnlyAdminOwnerUserPermission]
    def get(self, request):
        user = User.objects.get(username=request.user.username)
        user_serializer = UserSerializer(user)
        message = "You can only see this if you're an admin staff or owner"
        return Response(
            {"user": user_serializer.data, "message": message, "success": True},
            status=status.HTTP_200_OK,
        )

class OnlyInvestorAndOwnerUser(GenericViewSet):
    permission_classes = [IsAuthenticated, OnlyInvestorOwnerUserPermission]
    def get(self, request):
        user = User.objects.get(username=request.user.username)
        user_serializer = UserSerializer(user)
        message = "You can only see this if you're an investor or owner"
        return Response(
            {"user": user_serializer.data, "message": message, "success": True},
            status=status.HTTP_200_OK,
        )

class OnlyOwnerUser(GenericViewSet):
    permission_classes = [IsAuthenticated, OnlyOwnerUserPermission]
    def get(self, request):
        user = User.objects.get(username=request.user.username)
        user_serializer = UserSerializer(user)
        message = "You can only see this if you're an owner"

        return Response(
            {"user": user_serializer.data, "message": message, "success": True},
            status=status.HTTP_200_OK,
        )
In the code block above, the OnlyStaffOwnerUser class can only be accessible to authenticated staff and Owner, using the permission classes IsAuthenticated and OnlyStaffOwnerUserPermission.
OnlyAdminStaffOwnerUseris only available to admin staff and Owner.OnlyInvestorAndOwnerUseris also only available to Investors and OwnerOnlyOwnerUseris only available to owners.
Let's assign the views we created to routes. In urls.py, add the following:
from users.views import *

urlpatterns = [
    path('admin/', admin.site.urls),
]

urlpatterns += [
    path('user-auth/', LoginView.as_view({"post": "login"}), name = "user-login"),
    path('user-signup/', SignUpView.as_view({"post": "create"}), name = "user-signup"),
    path('all-user/', AllUser.as_view({"post": "get"}), name = "all-users"),
    path('authenticated-user/', OnlyAuthenticatedUser.as_view({"post": "get"}), name = "authenticated-user"),
    path('only-staff/', OnlyStaffOwnerUser.as_view({"post": "get"}), name = "only-staff"),
    path('only-admin/', OnlyAdminStaffOwnerUser.as_view({"post": "get"}), name = "only-admin"),
    path('only-investor-owner/', OnlyInvestorAndOwnerUser.as_view({"post": "get"}), name = "only-investor-owner"),
    path('only-owner/', OnlyOwnerUser.as_view({"post": "get"}), name = "only-owner"),
]
Deploying to Okteto
With the application completed, we will now proceed to deploying to Okteto. We'll be using the Okteto CLI to deploy our application.
To install Okteto CLI, use the command below:
$ brew install okteto
Not using MacOS? Check out the guide for installing on your OS on the installation page.
Before using the Okteto CLI, you need to log into the service to allow you to create, delete, push and synchronize changes from your local machine. You only need to do this once.
Login into Okteto Cloud by using the command below:
$ okteto context use https://cloud.okteto.com
A browser tab will open automatically, confirming that you have now logged in. If this the first time that you use Okteto, it will ask you to log in with your GitHub identity.
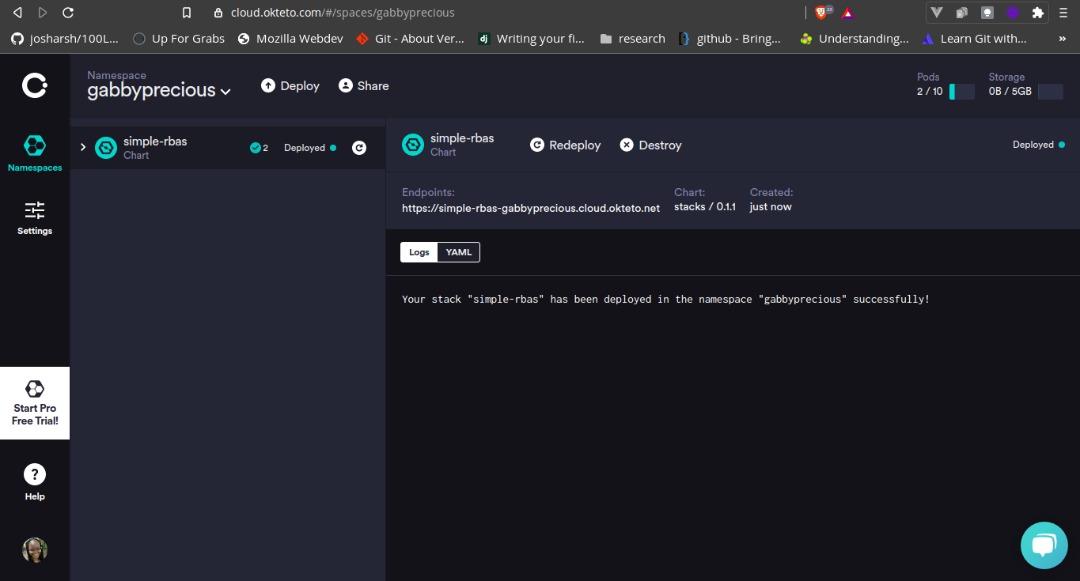
Next, we'll deploy the application using the stack file we created earlier:
$ okteto stack deploy --build
This command will build our API's container image using our Dockerfile and then deploy the services in Okteto Cloud using the stack file's instructions.
Now our API is live!!!
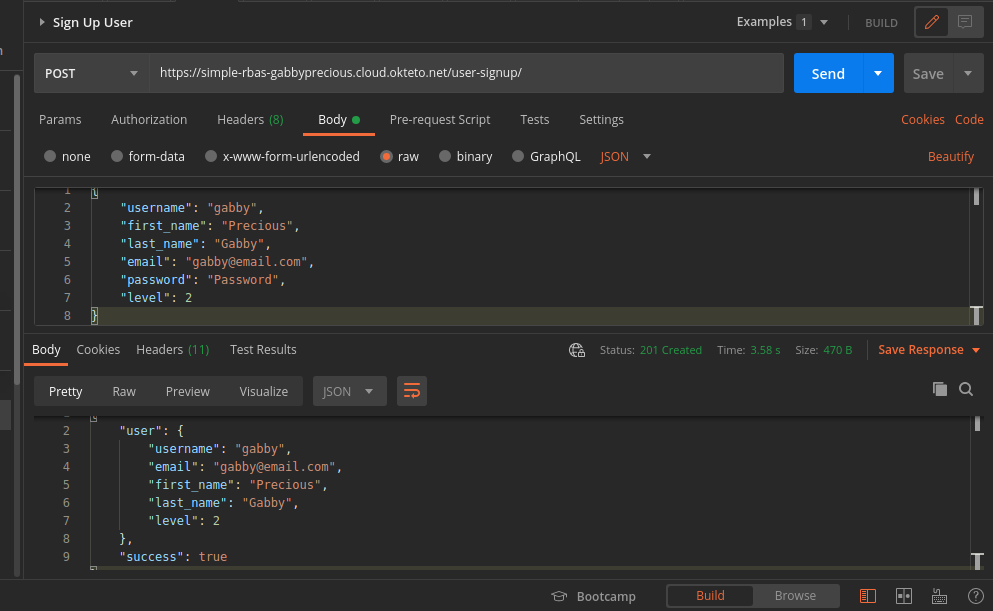
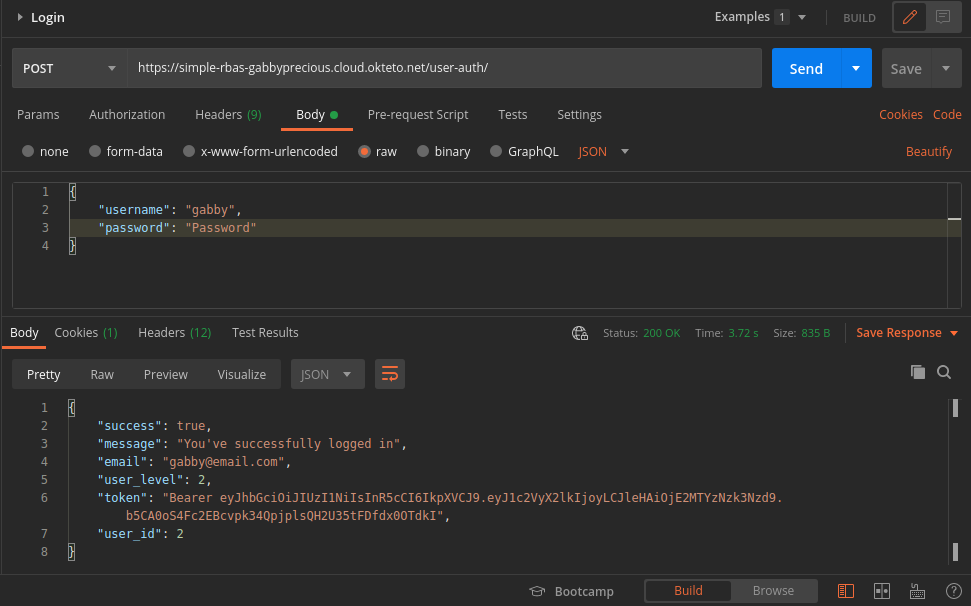
Testing
We'll be using Postman to test our newly deployed application. Postman is an API client that allows us test APIs we build in place. If you don't have the Postman client installed, follow the instructions on the downloads page to install it on your machine.
Retrieve the endpoint provided by Okteto from your dashboard:
Here are some few tests on Postman:
Sign Up User:
Login User:
Admin User:

Conclusion
In this article, you’ve learned and successfully built and deployed a Role-based Authorization System with Django, Docker, and Okteto.
Deployment and Development with Okteto are elegant and straightforward. Okteto also helps with hosting your application, creating accessibility and great accessibility to your project. You can find the code used in this article on GitHub.


 Arsh Sharma