How to Develop and Debug Python Applications on Kubernetes

Kubernetes is an open-source project for automating deployment, scaling, and management of containers. It has rapidly become the standard to run production workloads and the community around it is just great!
But developing on Kubernetes presents some challenges. The typical development workflow looks like this: write code, build a Docker image, push it to the registry, redeploy, validate your changes and repeat. This workflow is slow, and as anti-python as it could be. Python is famous for it's quick Read-Eval-Print loop, after all. We don't want to give that away when bulding Cloud Native applications.
Okteto was created to solve this problem. On this blog post, we will show you how Okteto improves the developer experience in Kubernetes for Python developers. You will be able to take full advantage of using an instant development environment, dependency caching, hot-reloading and even the PyCharm debugger while developing your application directly on Kubernetes.
Step 1: Deploy the Python Sample App
Get a local version of the Python Sample App by executing the following commands:
$ git clone https://github.com/okteto/python-getting-started
$ cd python-getting-started
The k8s.yml file contains the Kubernetes manifests to deploy the Python Sample App. Run the application by executing:
You can deploy to your own Kubernetes cluster or give Okteto Cloud a try. Okteto Cloud is a development platform for Kubernetes applications. Sign up today to get a free developer account with 4 CPUs and 8GB of RAM.
$ kubectl create -f k8s.yml
deployment.apps "hello-world" created
service "hello-world" created
This is cool! You typed one command and a dev version of your application just runs 😎.
Step 2: Install the Okteto CLI
The Okteto CLI is an open-source project that lets you develop your applications directly on Kubernetes while taking advantage of your language's toolkit. We will use it to speed up our development cycle instead of using the typical development workflow based on building docker images and redeploying containers.
Install the Okteto CLI (>= 1.12.13):
MacOS / Linux
$ curl https://get.okteto.com -sSfL | sh
Windows
Download https://downloads.okteto.com/cli/okteto.exe and add it to your $PATH.
Step 3: Create your okteto manifest
To start developing on the Python Sample App you first need to create an okteto manifest. With the Python Sample App deployed, run the following command to create your okteto manifest:
$ okteto init
This command walks you through creating an okteto manifest.
It only covers the most common items, and tries to guess sensible defaults.
See https://okteto.com/docs/reference/manifest for the official documentation about the okteto manifest.
Use the arrow keys to navigate: ↓ ↑ → ←
Select the deployment you want to develop:
  ▸ hello-world
    Use default values
The okteto init command will scan the available deployments in your Kubernetes namespace and ask you to pick one.
Select the hello-world deployment. It's the one we deployed on the previous step.
 ✓  hello-world
 ✓  Deployment 'hello-world' successfully analyzed
 ✓  okteto manifest (okteto.yml) created
 i  Run 'okteto up' to activate your development container
The okteto init command creates the following okteto.yml file:
name: hello-world
command: bash
volumes:
  - /root/.cache/pip
sync:
  - .:/usr/src/app
forward:
  - 8080:8080
reverse:
  - 9000:9000
This file defines how to activate a development container for the Python Sample App:
name: the name of the Kubernetes deployment you want to put on development mode. development-environment).command: the start command of the development container.volumes: a list of paths in your development container to be mounted as persistent volumes. This is useful to persist the pip cache.sync: the folders that will be synchronized between your local machine and the development container.forward: a list of ports to forward from your development container.reverse: a list of ports to reverse forward from your development container to your local machine.resources: the resources configuration (CPU and memory) of the development container.
Also, the okteto init command creates a .stignore file to indicate which files shouldn't be synchronized to your development container.
This is useful to avoid virtual environments, build artifacts or git metadata.
Step 3: Activate your development container
You'll notice an okteto.yml file at the root of your repository. This Okteto manifest is where the configuration required to spin up your development environment lives.
name: python-getting-started
build:
  hello-world:
    image: okteto.dev/python-hello-world:1.0.0
    context: .
deploy:
  - kubectl apply -f k8s.yml
dev:
  hello-world:
    command: bash
    sync:
      - .:/usr/src/app
    reverse:
      - 9000:9000
    volumes:
      - /root/.cache/pip
It's divided into three sections that tell Okteto the configuration to keep in mind when building, deploying, and developing your microservices. The dev section specifically contains the configuration which is to be used when launching your development container:
command: the start command of the development container.sync: the folders that will be synchronized between your local machine and the development container.reverse: a list of ports to reverse forward from your development container to your local machine.volumes: a list of paths in your development container to be mounted as persistent volumes. This is useful to persist the pip cache.
You can check out the documentation if you'd like to know more about the manifest.
Execute the following command to activate your development container:
$ okteto up
 ✓  Persistent volume successfully attached
 ✓  Images successfully pulled
 ✓  Files synchronized
    Namespace: default
    Name:      hello-world
    Forward:   8080 -> 8080
    Reverse:   9000 <- 9000

Welcome to your development container. Happy coding!
default:hello-world app>
Working in your development container is the same as working on your local machine. Start the application in development mode by running the following command:
default:hello-world app> python app.py
Starting hello-world server...
 * Serving Flask app "app" (lazy loading)
 * Environment: development
 * Debug mode: on
 * Running on http://0.0.0.0:8080/ (Press CTRL+C to quit)
Test your application by running the command below in another local shell:
$ curl localhost:8080
Hello world!
Step 4: Develop directly on Kubernetes
Open the app.py file in your favorite local IDE and modify the response message on line 7 to be Hello world from the cluster!. Save your changes.
@app.route('/')
def hello_world():
    return 'Hello world from the cluster!'
}
Okteto will synchronize your changes to your development container. Flask's auto-reloader will detect the changes automatically and restart the application with the new code.
 * Detected change in '/okteto/app.py', reloading
 * Restarting with stat
Starting hello-world server...
 * Debugger is active!
 * Debugger PIN: 281-298-026
Call your application from a local shell to validate the changes:
$ curl localhost:8080
Hello world from the cluster!
Cool! Your code changes were instantly applied to Kubernetes. No commit, build or push required 😎!
Step 5: Debug directly in Kubernetes
Okteto enables you to debug your applications directly from your favorite IDE. Let's take a look at how that works in one of python's most popular IDE's, PyCharm.
For VS Code users, this document explains how to configure the debugger with
debugpy.
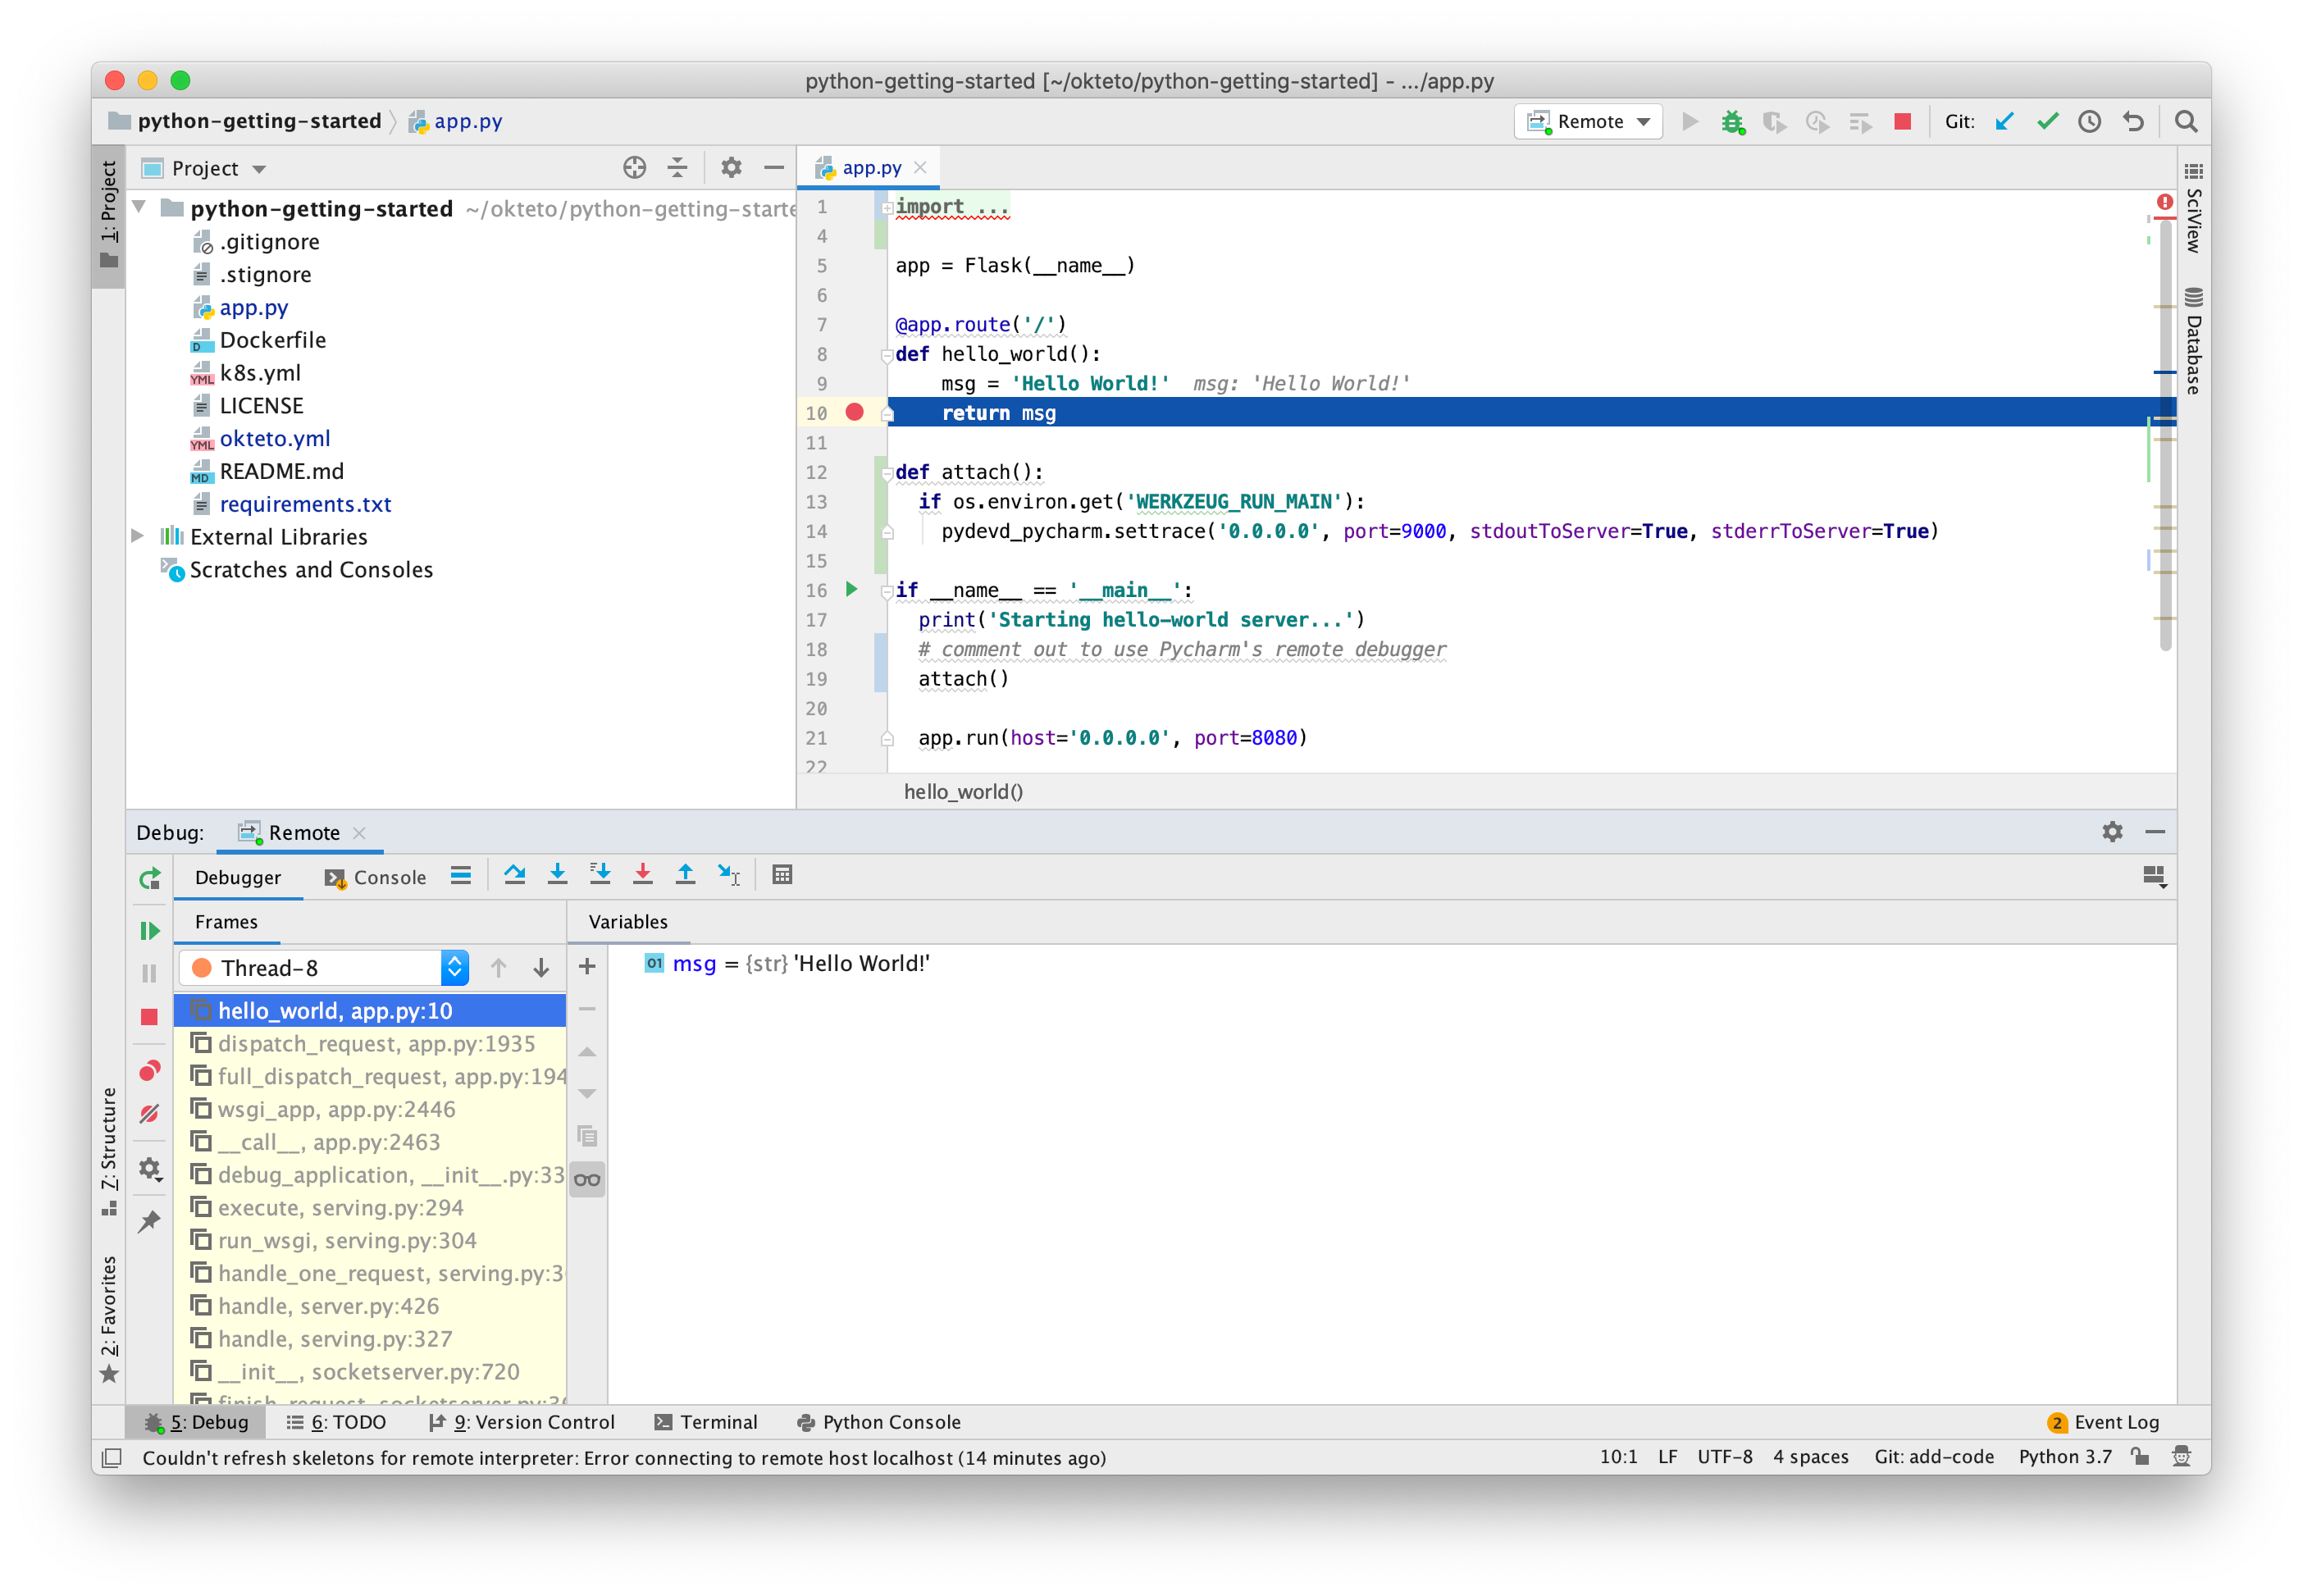
First, open the project in PyCharm, remove the comments on app.py line 20.
if __name__ == '__main__':
  print('Starting hello-world server...')
  # comment out to use Pycharm's remote debugger
  attach()

  app.run(host='0.0.0.0', port=8080)
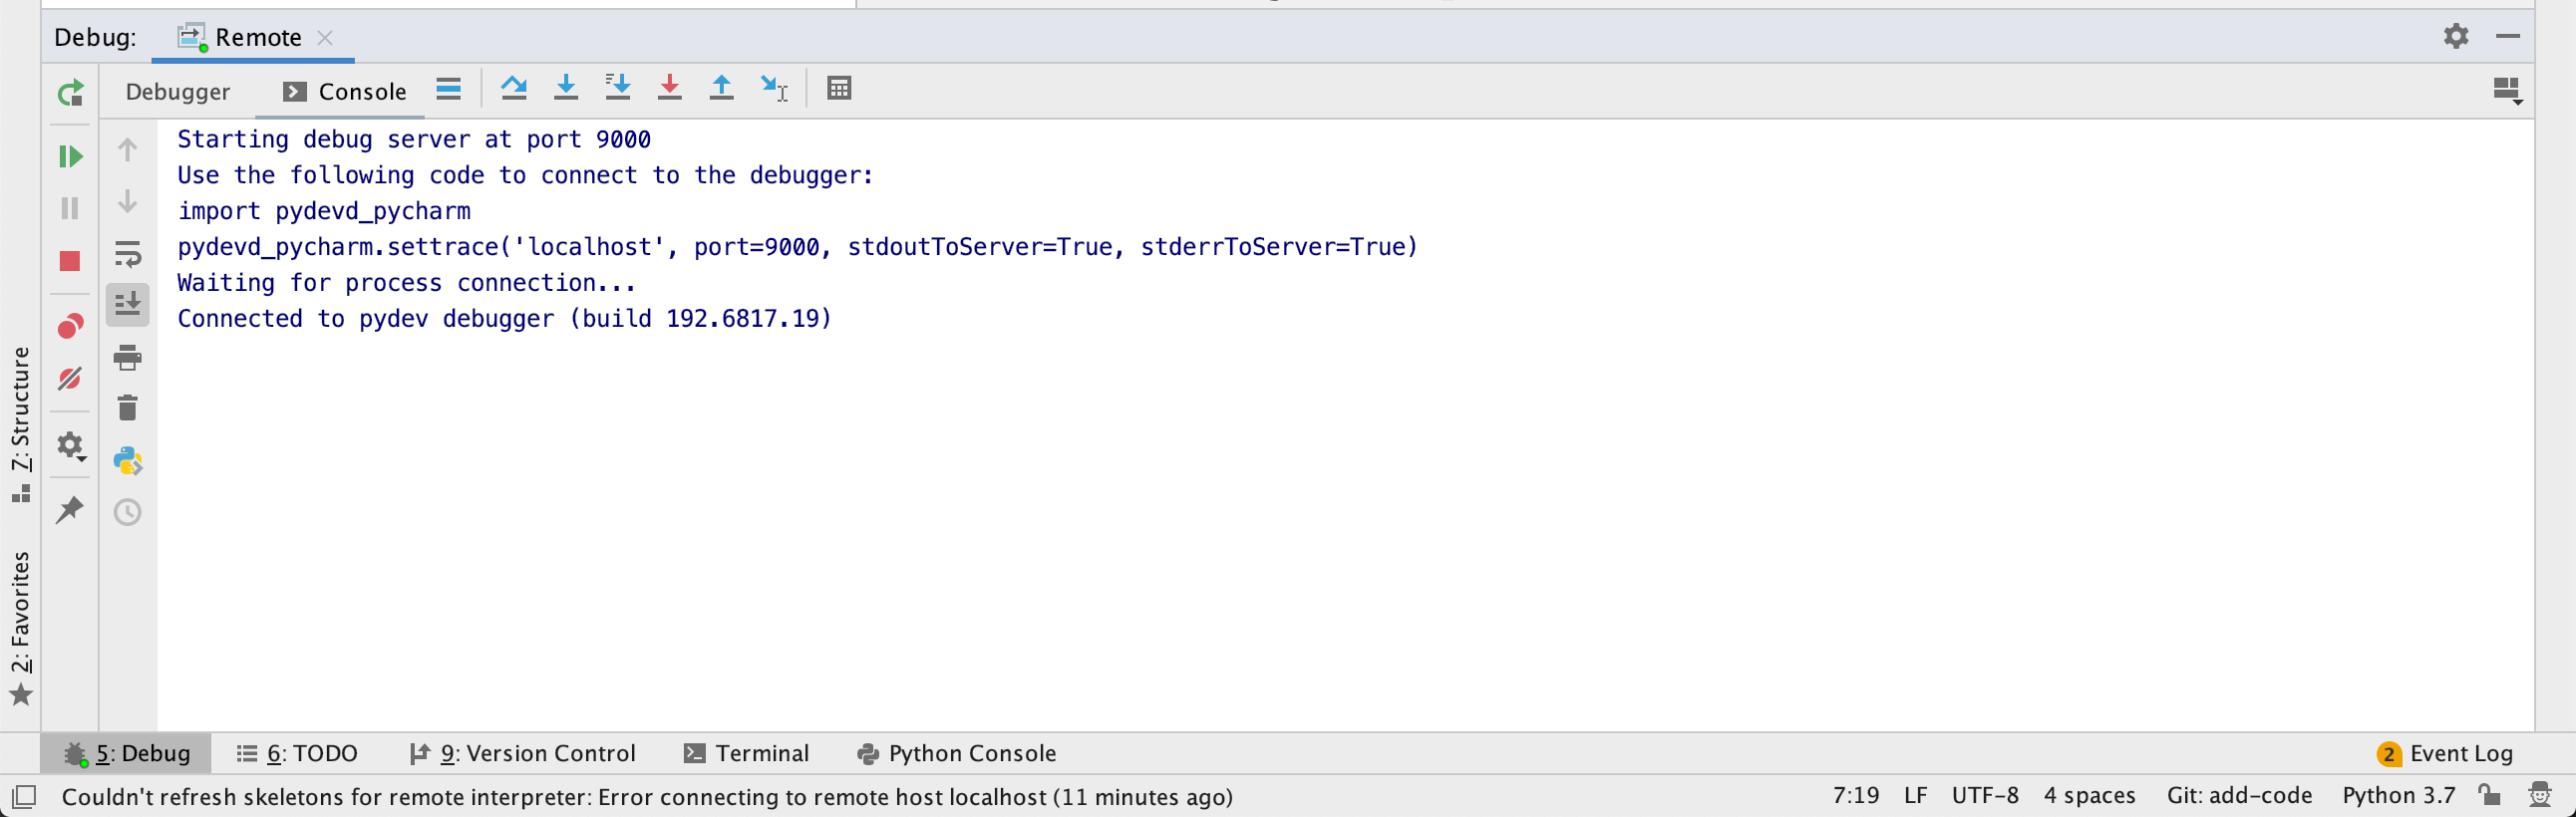
Second, launch the Remote Debug Server by clicking on the Debug button on the top right. Ensure that the Debug Tool Window shows the Waiting for process connection.. message.
This message will be shown until you launch your app on the development container shell and it connects to the Debug Server.
Starting hello-world server...
 * Serving Flask app "app" (lazy loading)
 * Environment: development
 * Debug mode: on
 * Running on http://0.0.0.0:8080/ (Press CTRL+C to quit)
 * Restarting with stat
Starting hello-world server...
Connecting to debugger...
On your local machine, switch to the Debug Tool Window. Once the app connects it will show the connection to the pydev debugger.
Press the resume button to let the execution continue.
Add a breakpoint on app.py, line 10, and then call your application from your local shell:
$ curl localhost:8080
The execution will halt at your breakpoint. You can then inspect the request, the available variables, etc. Your code is executing in your development container in Kubernetes, but is being debugged on the local machine. Pretty cool no? 😉
How does it work?
The PyCharm project includes a debugging configuration to start the remote debug server and to listen for connections on localhost:9000. The Okteto manifest is configured to start a reverse tunnel on port 9000 when the development container is activated.
This way, when the service it's started in your development container, the connection is sent back to your local machine through the reverse tunnel, where the remote debug server receives and starts the debugging process.
This configuration allows you debug your application while fully integrated in Kubernetes. And the coolest thing is that since all of this is described in your .idea and Okteto manifests, everyone collaborating in your project will get the exact same configuration by simply running okteto up 🤖.
Conclusions
Kubernetes has the potential to be a great development platform, providing replicable, resource-efficient and production-like development environments. We have shown you how to use Okteto to create a development workflow that also lets you take advantage of features like incremental builds, debuggers or hot reloads while developing your application directly on Kubernetes.
Visit our website to know more about how to improve your team developer productivity with Okteto. Follow us on Twitter and join our #okteto channel in the Kubernetes community Slack to share your feedback with our community.


 Arsh Sharma