Getting started with Okteto External Resources
The External Resources feature in Okteto is a powerful mechanism that enables you to manage the lifecycle of external resources as part of your Okteto development environment. This means you can define the external resources that comprise your application, include those resources in Okteto's garbage collection process, and even destroy those resources when you finish working with your development environment.
Here are just a few examples of external resources you can use with Okteto:
- A markdown file (e.g. README, API Documentation)
- MongoDB Atlas Instance
- LaunchDarkly environments
- Amazon SQS queues
- Amazon S3 buckets
- Amazon RDS databases
- AWS Lambda Functions
- GCP Cloud Storage
- GCP Cloud Functions
- GCP BigQuery
- Backstage
- Atlassian Confluence Documents
This is not an exhaustive list and only demonstrates the flexibility of this feature. You can include anything as an external resource. You no longer need to use different tools to work on your application in Okteto and you won't need to worry about rogue external resources continuing to run once you are done with your work.
When you configure External Resources in Okteto you can see those resources within the Okteto UI, can click to go directly to those resources in their respective platform, and include them in your Okteto deploy and destroy configurations.
Overview
When you configure the external section in your Okteto manifest, keep in mind the following:
- You can create a container image that includes any external tools (to Okteto) that you need in order to provision or access your external resources.
- This container image can be included in your Okteto manifest's
deployanddestroysections - External resources are destroyed when your Okteto namespace is deleted
- External resources are covered by Okteto's garbage collection process
Configuring external resources
Using external resources with Okteto requires configuring three areas of your Okteto manifest:
- The
deploysection to provision your external resources (e.g. call the AWS API to create an s3 bucket) - The
destroysection to ensure the external resource is destroyed (as appropriate) when your development environment is destroyed - The
externalsection to populate the Okteto UI and link to the external resource
You can leverage Okteto Variables to pre-define access keys, credentials, etc, for these external resources and refer to such variables in your Okteto manifest using the $SOME_VAR syntax.
Note for Admins: We strongly recommend configuring external resource variables in Variables in the Admin dashboard to centralize and manage them securely.
Configuring the deploy section
When you use an external resource with Okteto it needs to be provisioned like any other resource. If we use the example above of creating an AWS S3 bucket, we could add the following to our Okteto manifest in the deploy section:
deploy:
  image: okteto/pipeline-runner:1.0.0-sam
  commands:
    - name: Create an AWS S3 bucket
      command: |
        sh s3/deploy.sh
In this example we're using a script that contains all of the instructions to do the provisioning work and executing that script in this particular stage of the Okteto deploy section.
You can also use the OKTETO_BUILD_XXX_IMAGE ENV VAR in the deploy section to refer to specific container images.
Configuring the destroy section
We also need to ensure that the external resources we provision are destroyed when we are finished using our development environment. If we don't include them in the destroy step, we risk accumulating zombie resources that continue to operate and potentially accrue additional cloud spend. This also allows Okteto to perform this process for you so you never have to worry about it. Here's a sample destroy section using the same AWS S3 bucket example above:
destroy:
  image: okteto/pipeline-runner:1.0.0-sam
  commands:
    - name: Delete AWS S3 bucket
      command: |
        sh s3/destroy.sh
Configuring the external section
Lastly, we want our external resources to be visible in the Okteto UI and accessible to developers working with them. To accomplish this, we need to define the external section in the Okteto manifest. This section takes the external resources you've provisioned in the deploy section and makes them a clickable element within the Okteto UI so any developer working in the same namespace can directly access that external resource.
In the example below we're including a README file that documents the external resource we're using (S3 bucket) as well as the S3 bucket itself. You can see additional configuration details in our References section:
external:
  readme:
    icon: okteto
    notes: README.md
    endpoints:
      - name: readme
        url: https://github.com/okteto/external-resources-aws
  s3:
    icon: aws
    notes: s3/notes.md
    endpoints:
      - name: bucket
You can also use the dynamic endpoints feature here to provide more flexibility in the URLs.
Every keyword that you see here is opinionated except for readme: and s3:. Those two keywords, the names of the external resources being defined here, can be anything you want them to be. For example, if we want to call the readme: resource dundie_award: you can do so. Similarly, you could name s3: something like parkour: and it will work just fine.
Whatever name you use to label these resources will be what's shown in the Okteto UI. Choose wisely!
Customizing your external resource UI elements
As you configure your external resources in this section, keep in mind the following definitions:
notes: is used to provide context in the form of a relative link to a markdown file. The contents are displayed in the Okteto UI (see below).

icon: specifies one of several predefined icons you can use when this resource is rendered in the Okteto UI. The current list of supported icons is:
aws | container | dashboard | database | default | function |
gcp | graph | launchdarkly | mongodb | okteto | storage |
endpoints: contain information on how to access the external resource using:
name:to name the endpoint you're definingurl:to provide the specific url for accessing the resource
The name of the endpoint is used to inject or modify environment variables. In this example, one of those would be: OKTETO_EXTERNAL_FUNCTIONS_ENDPOINTS_DATA_AGGREGATOR_URL. This is also referred to as Dynamic Endpoints.
All of this information can be found and in a more concise format in our References section.
Using dynamic endpoints with external resources
Dynamic Endpoints is an Okteto feature that lets you define non-static URLs in your Okteto manifest. There are generally three endpoint scenarios:
- A static, unchanging URL that you know and that will remain the same across all users and development environments
- A hybrid URL that may have a static component but incorporate a dynamic one such as a username (e.g. user1.example.com/endpoint)
- A fully dynamic URL that my be completely unique per user
Using the Dynamic Endpoints feature Okteto provides means you can omit the url: key from a specific external resource in your Okteto manifest and instead compile that URL within the deploy section (either directly or within an included script).
For example, if have the following deploy section defined:
deploy:
  image: okteto/pipeline-runner:1.0.0-sam
  commands:
    - name: Create an AWS SQS queue
      command: |
        sh sqs/deploy.sh
We can define the endpoint dynamically within the deploy.sh script (example here). In simpler terms, the URL is dynamically compiled on this line:
dashboard="https://${AWS_REGION}.console.aws.amazon.com/sqs/v2/home?region=${AWS_REGION}#/queues/${encoded}"
That will compile the appropriate URL, using Okteto environment variables, that specify where a developer in the same namespace will go when they click on the AWS SQS external resource component in the Okteto UI (see below).
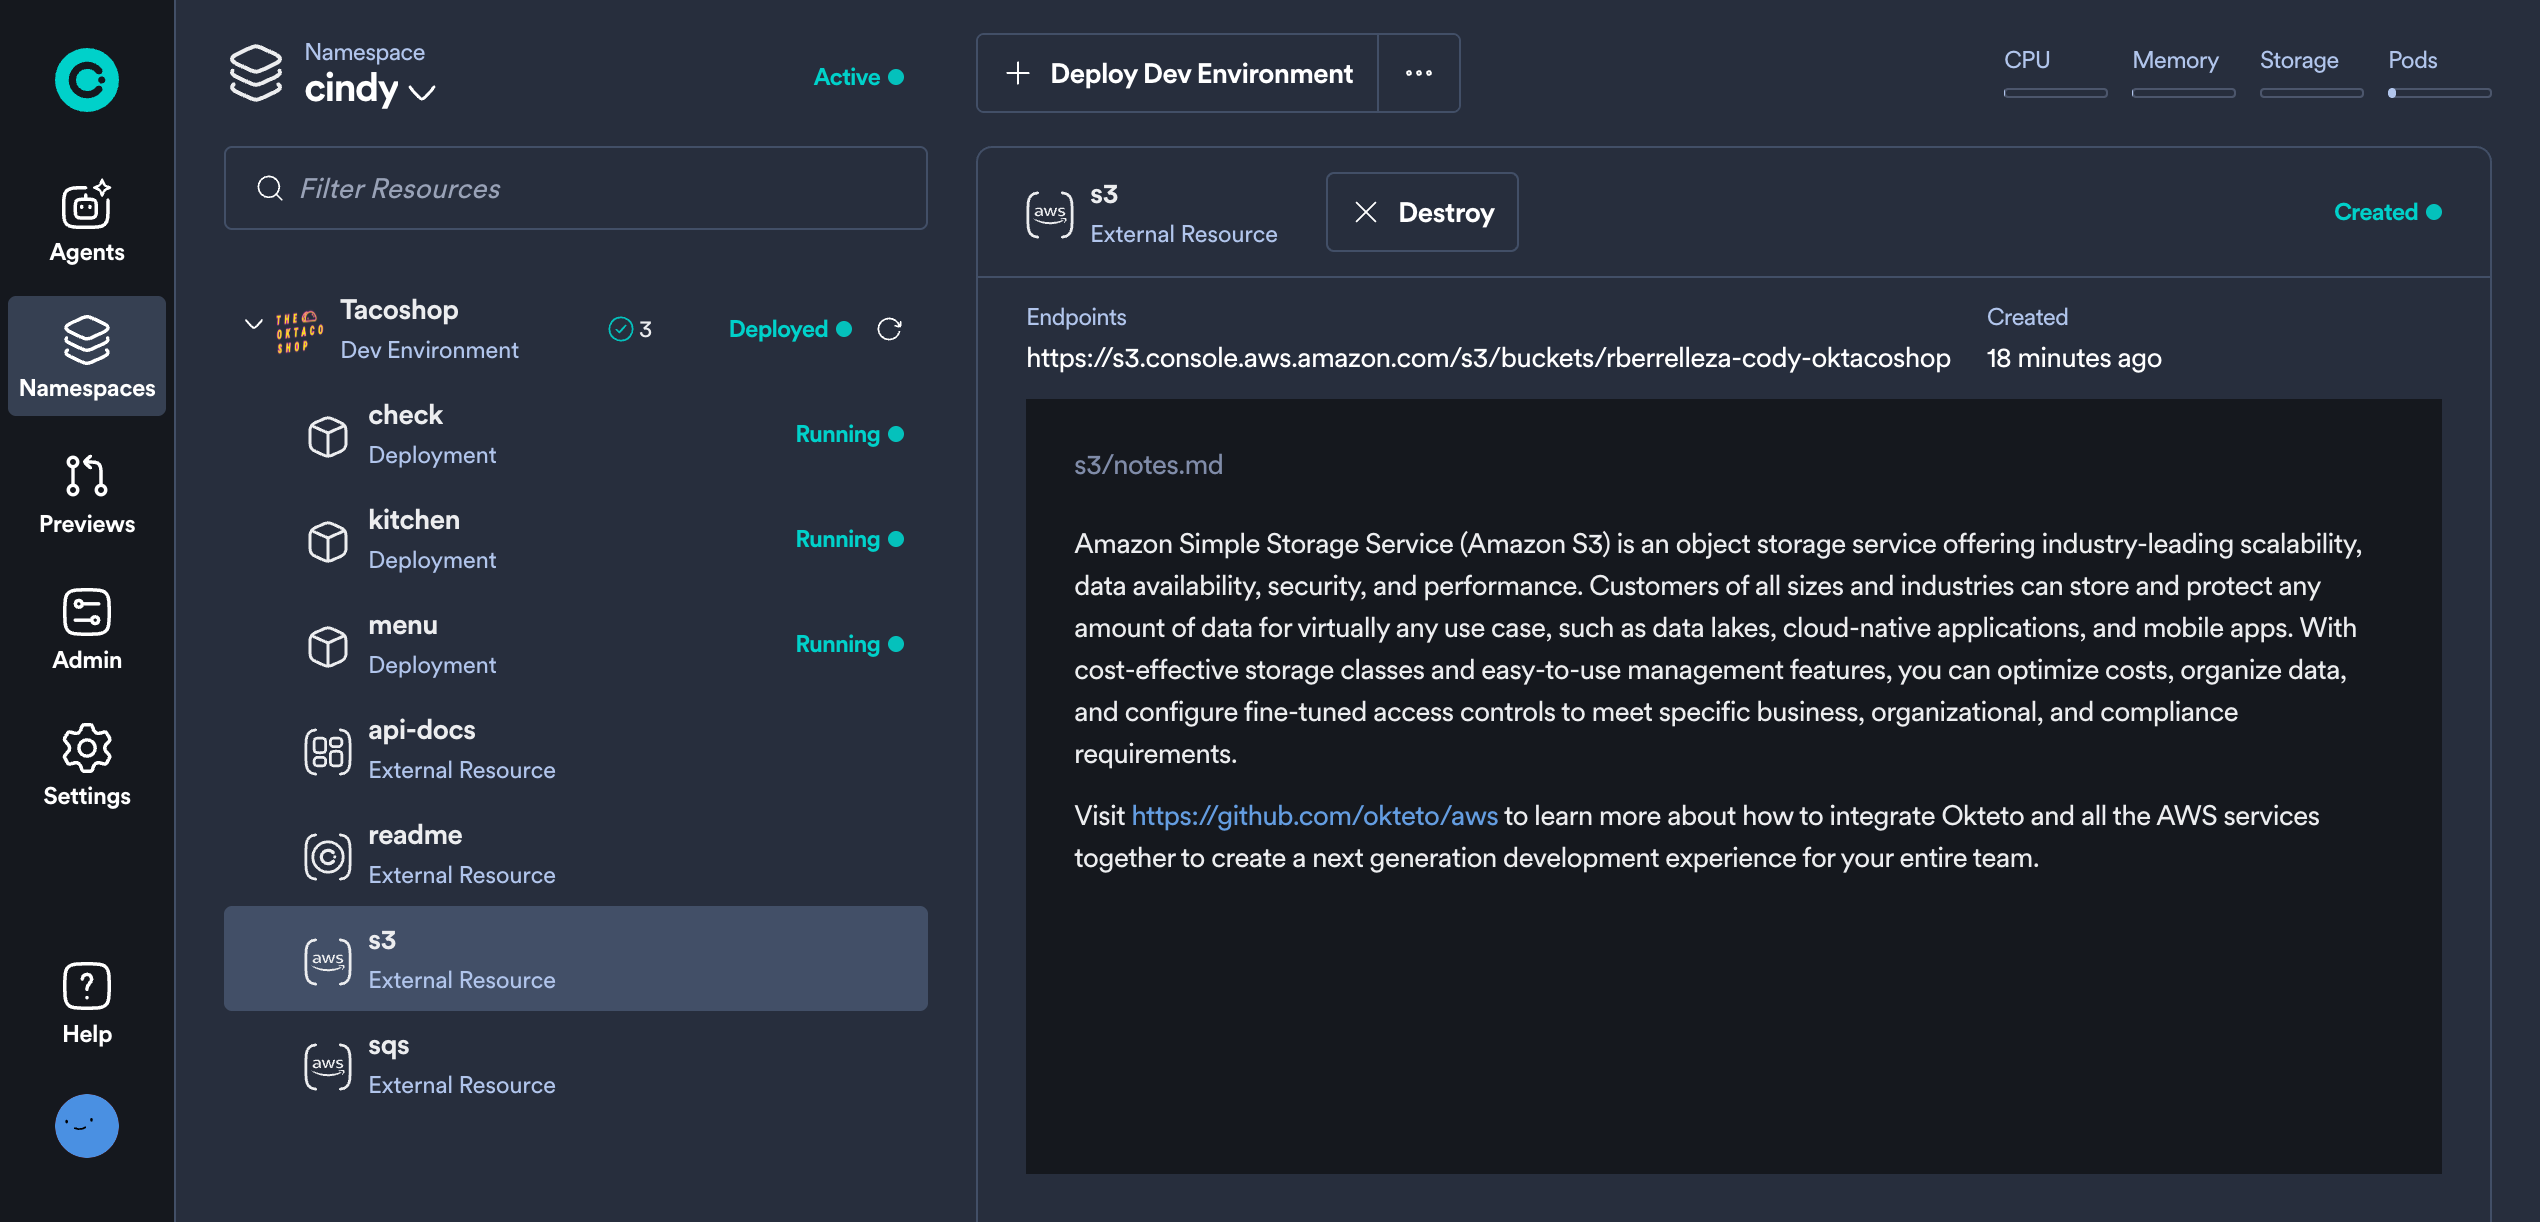
Destroy external resources from the Okteto UI
When you're done working on your application that uses external resources, you can ensure those resources are removed by clicking on the dev environment for your application, selecting the specific external resource you'd like to destroy, and clicking the Destroy button above the output area of the page.
This will ensure that the external resource does not remain active and idle when your development completes. This helps keep costs down when resources are not in use.
Example: Deploy a Development Environment with External Resources
Now that we've walked through a sample of an external configuration, let's look at using this within the broader context of an application we're working on. You can navigate to our demo repo to follow along if you'd like.
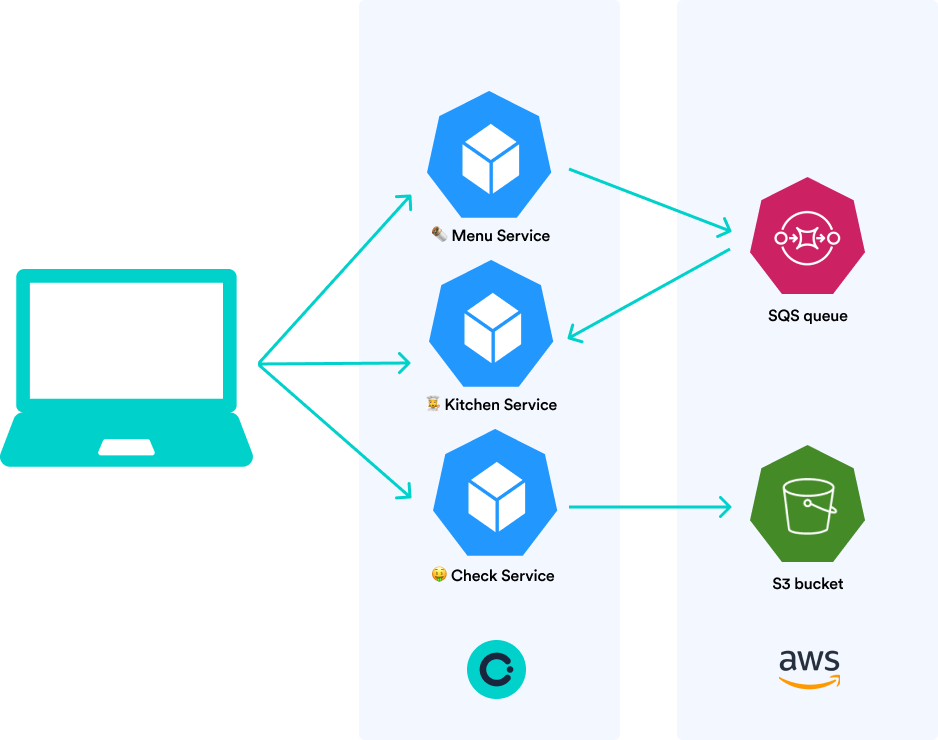
In this example we'll be configuring and deploying a development environment that includes polyglot microservices, an AWS SQS queue, and an S3 bucket.
Prerequisites
-
Okteto CLI 2.14 or newer
-
An AWS account
-
An Okteto account
-
Create a set of IAM keys for your AWS account
-
Create the following Okteto Variables:
AWS_ACCESS_KEY_ID: The Access Key ID of your IAM user AWS_SECRET_ACCESS_KEY: The Secret Access Key of your IAM user AWS_REGION: The region in AWS you would like to use for the external resources
Notice the external configuration in this demo. It specifies most attributes except for url for most of these resources.
external:
  readme:
    icon: okteto
    notes: README.md
    endpoints:
      - name: readme
        url: https://github.com/okteto/external-resources-aws
  sqs:
    icon: aws
    notes: sqs/notes.md
    endpoints:
      - name: queue
  s3:
    icon: aws
    notes: s3/notes.md
    endpoints:
      - name: bucket
  api-docs:
    icon: dashboard
    notes: check/notes.md
    endpoints:
      - name: docs
The url: keys are missing from most external resource (sqs, s3, and api-docs) because they've been defined in the deploy > commands > command section using the Okteto Variables you defined above and the dynamic endpoints feature.
Alternatively, you could remove the respective deploy commands and add the url endpoints here manually, but this is a good example of how flexible the manifest file can be.
Once you've configured the prerequisites, you can deploy this on your Okteto instance:
$ git clone https://github.com/okteto/external-resources-aws
$ cd external-resources-aws
$ okteto context use $OKTETO_CONTEXT
$ okteto deploy
The okteto deploy command will deploy the Okteto environment, external resources, and anything else defined within your Okteto manifest deploy section. You can think of this command as the "on button" for your remote cloud development environment within Okteto.
Once the application has been deployed in Okteto, you can work on the menu microservice by running the command: okteto up menu. In this specific example, once you've executed this command you'll also need to run yarn start from the container.
To start the other services in this example (kitchen and check) you'll need to run these commands from the container, respectively:
- go run main.go
- python main.py