GitHub Integration
You can configure Okteto to use a GitHub to authenticate your users as well as give them access to private GitHub repositories.
There are several reasons for considering this approach including:
- Your users can select a repo from a list, instead of having to type the full repository URL.
- Give everyone on your cluster read-only access to private repositories.
- Control access to Okteto and the repositories at the Organization level, or per repository.
- The pipelines use an app-scoped token, instead of a shared user.
Configuration Steps
Setting up the GitHub integration requires several steps in both GitHub and your Okteto instance. Complete the following steps in GitHub:
Complete the following steps in your Okteto Self-Hosted instance:
Once this configuration has been completed, your instance of Okteto will use the GitHub Application you authenticate during the clone repository step of any Okteto pipelines.
Creating the GitHub App
- In the upper-right corner of any page in GitHub, select your
profile icon > Organizations. - Click on the
settingsof the organization you want to use to create the application. - In the left navigation, select
Developer settings > GitHub Apps. - Select
New GitHub App. - Complete the following fields as follows:
GitHub App Name:enter an appropriate name for your application (e.g.okteto-$YOUR_GITHUB_ORGANIZATION)Homepage URL:https://okteto.$SUBDOMAINCallback URL:https://okteto.$SUBDOMAINAuthorization callback URL:https://okteto.$SUBDOMAIN/auth/callback?origin=github (Necessary if you are going to use GitHub as your auth provider)
- Uncheck the
Expire user authorization tokensoption. - Check the
Request user authorization (OAuth) during installationoption. - On the
Post Installationsection, check theRedirect on updateoption. - On the
Webhooksection, uncheck theActiveoption. - On the
Repository permissionssection, set theContentspermission toRead-only. - On the
Organization permissionssection, set theMemberspermission toRead-only. - On the
User permissionssection, set theEmail addressespermission toRead-only. - On the
Where can this GitHub App be installed?section, select theAny accountoption. This will allow your users to install the application in their own GitHub account and deploy personal repositories in your Okteto instance. - Press the
Create GitHub Appbutton. - On the next screen, copy the values of
App IdandClient Id, you'll need to pass those to your Okteto instance in a future step.
See Creating a GitHub App for more information on creating a GitHub App from GitHub’s Developer guide.
Generating a private key for the GitHub App
After you have created the GitHub App, you will need to generate a private key for authenticating to the GitHub App.
To generate a private key authenticating to the GitHub App:
- In the upper-right corner of any page in GitHub, select your
profile icon > Organizations. - Click on the
settingsof the organization you want to use to create the application. - In the left navigation, select
Developer settings > GitHub Apps. - Select the GitHub App.
- On the
Client secretssection, press theGenerate a new client secretbutton. Copy the value and save it in a safe place, since it won't be displayed again. You'll need to pass those to your Okteto instance in a future step. - On the
Private keyssection (it's at the bottom of the page), press theGenerate a private keybutton. A file with the private key will be saved in your computer.
Adding the GitHub App Configuration to Okteto
Add the values we generated in the previous steps to your existing Helm configuration file.
github:
  enabled: true
  appId: ${YOUR_APP_ID}
  clientId: ${YOUR_CLIENT_ID}
  clientSecret: ${YOUR_CLIENT_SECRET}
  installationUrl: https://github.com/apps/${YOUR_GITHUB_APP_NAME}/installations/new
  appPrivateKey: |
    -----BEGIN RSA PRIVATE KEY-----
    ......
    .....
    -----END RSA PRIVATE KEY-----
You can also use a secret to store the clientSecret and the appPrivateKey.
clientIDandclientSecretrefers to the values of the GitHub App you just created.appPrivateKeyis the private key you generated.
You can also use the appId and clientId values of your GitHub application in the
auth.githubsection of your Helm configuration file if you're using GitHub as your authentication provider.
Once you have updated your Helm configuration file, run the following command to reconfigure your Okteto instance:
helm upgrade okteto okteto/okteto -f config.yaml --namespace=okteto
If you're doing this as part of a fresh install, then run the following command:
helm install okteto okteto/okteto -f config.yaml --namespace=okteto
Verifying your installation
If the installation was successful, you should now see a GitHub option in the Deploy from Git dialog.
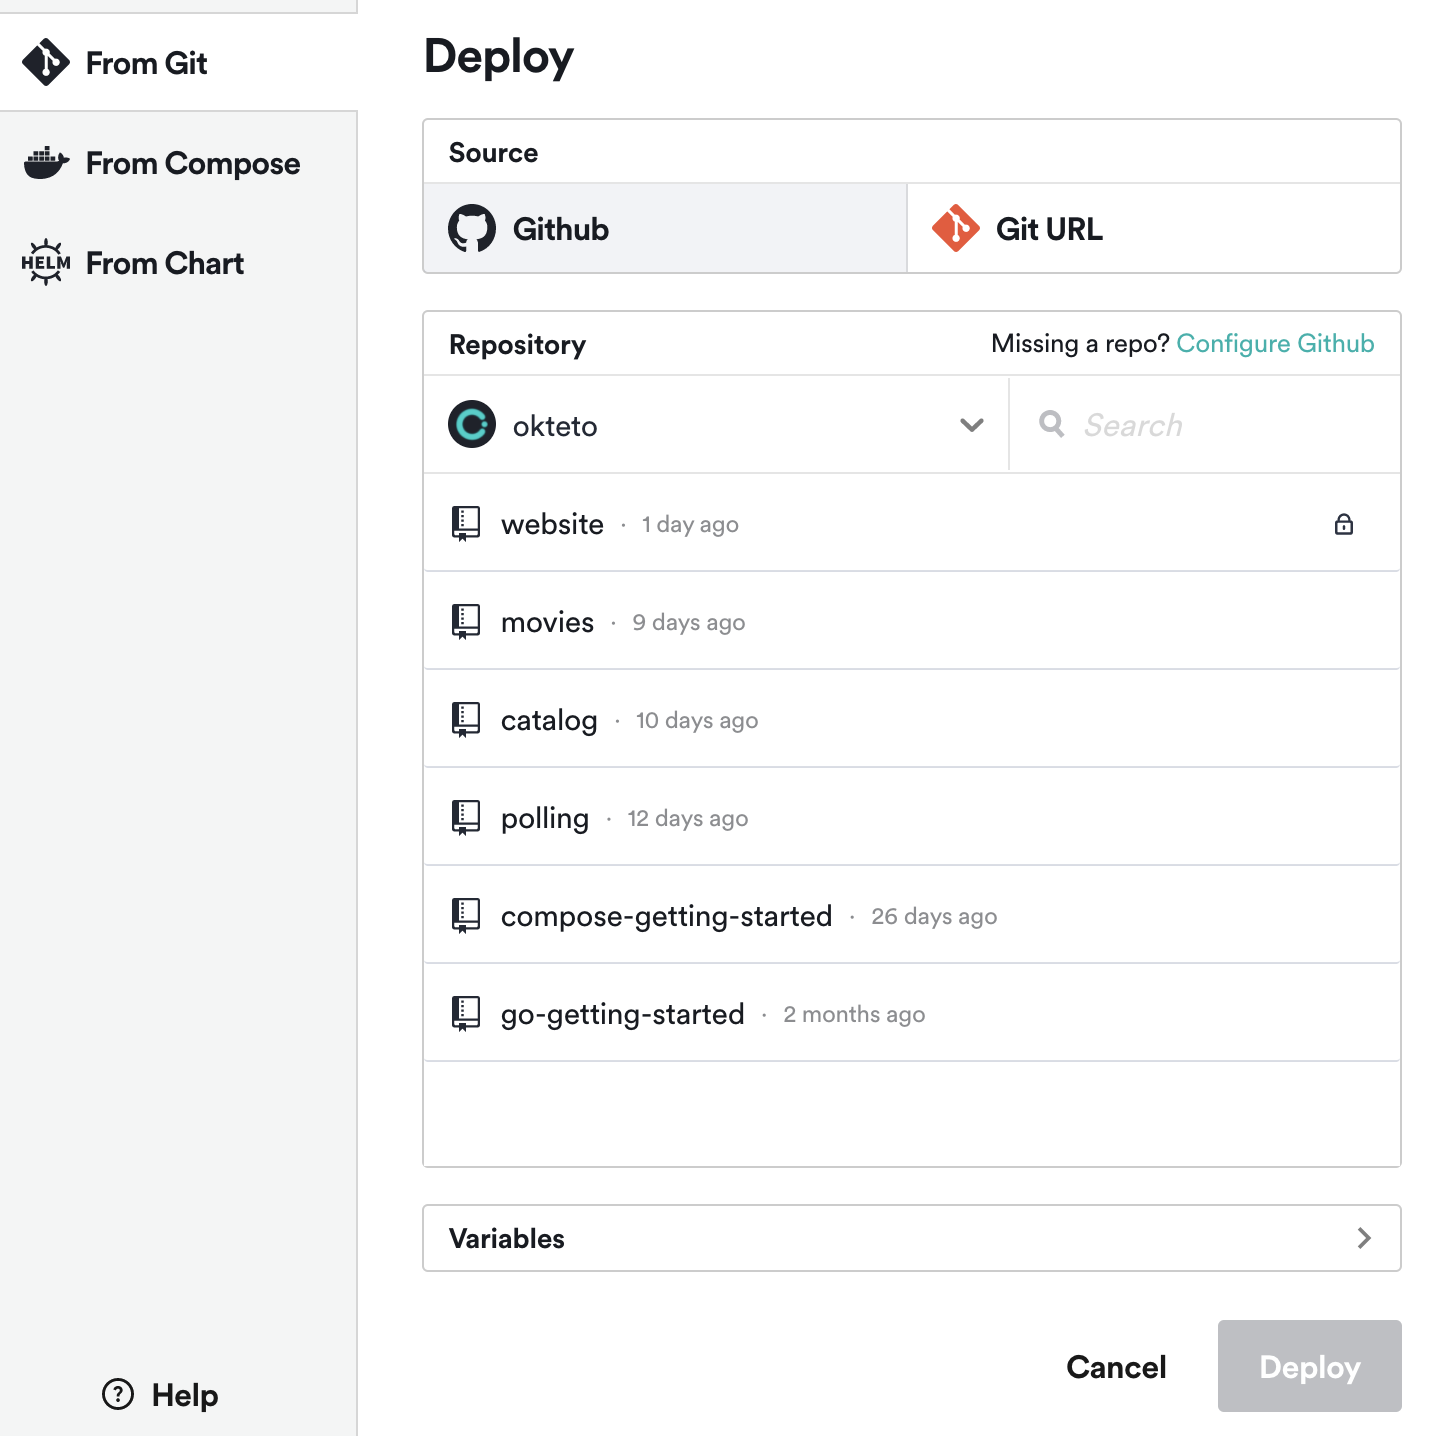
When you click on it, you should see the list of repositories that you added in the previous step. This document has further information on how to deploy a private repository.